Every owner knows that no matter how easy it is to care for a pet, the cat still requires attention and proper maintenance.
In a house where a cat lives, a scratching post is one of the main attributes. With the help of this accessory, the pet can sharpen its claws, and the cat owner will ensure the safety of the furniture and walls in the house.
The most popular homemade scratching posts (manufacturing instructions)
Any owner can make a scratching post for their pet themselves. First you need to choose the desired type of product and stock up on the appropriate materials.
Corrugated cardboard scratching post
This type is the most economical and environmentally friendly; its production does not require much time.
Materials needed: corrugated cardboard or cardboard boxes, thick paper, adhesive tape or PVA glue, knife.
One of the bloggers, Andrey Deveykin, made a scratching post in this form. Thanks to him for providing the photographs.
Manufacturing:
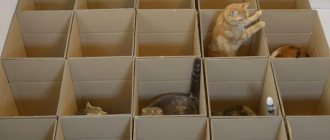
- lay out cardboard boxes, draw strips about 10-15 cm wide on them;
- cut out the resulting strips and start rolling them. The very first strip is the base of the structure. It needs to be rolled up as tightly as possible and secured with PVA or adhesive tape;
- gradually increase the volume by gluing strips and fixing them with tape or PVA;
- the last strip must be secured especially carefully so that it holds the entire structure and does not allow it to fall apart after the cat’s first attempt to sharpen its claws;
- The resulting scratching post must be placed on thick paper, circled around the edges and cut along the line. Glue the resulting paper figure to the bottom of the structure.
Corner scratching post
To make a corner model, you will need boards the width of a door frame. A thick fabric is attached over the boards or a thick rope made of natural materials is wound. When the product is ready, it is fastened on both sides of the outer corner.
Here is an example of step-by-step manufacturing of a corner scratching post:
- Take a board 200 mm wide and 1.2 meters long.
- Saw it in half.
- The result is two identical boards that need to be connected using dowels. It is better not to use self-tapping screws (since the cat, when sharpening its claws, may get into their cap). By the way, we must remember to process the cut edges so that our cat does not harm himself.
- Connect two pieces and make marks every 8 cm; there will be dowels in these places.
- We take dowels with a diameter of 6 mm and a length of 30 mm. Accordingly, in one of the workpieces you need to drill holes 15 mm deep (with a 6 mm drill) from the end in the marked places.
- You need to hammer the dowels into the resulting holes to equal lengths; you can use a square for this.
- In another workpiece, holes must be drilled from the front side.
- Next, fasten the workpieces using glue and wait until it dries.
- For upholstery, you can use carpet, first dividing it into two equal parts.
- You can secure the carpet using a stapler on the inside of the scratching post. The remaining part needs to be covered with glue and glued to the boards. And also attach the second end of the carpet using a stapler.
- You can attach the scratching post to the wall using the corners (bottom and top). You need to drill holes in the wall where the corners are attached, and then hang the scratching post using self-tapping screws.
- Afterwards, do not forget to check that the scratching post is holding well by hanging the cat on it).
Wall-mounted scratching post
The principle of its manufacture is the same as the corner version, but for the work one takes one wide board and attaches it to the wall so that the cat can easily reach it by standing up to its full height. It is important that the cat has free access to the scratching post. It is better not to place it in the bathroom or hallway. You need to determine where your pet spends the most time and place the device there.
Scratching post-post
For work you will need: a beam approximately 70 cm long and at least 5 cm wide, a round or square support made of wood about 4 cm thick.
Instructions for assembling the scratching post:
- On the support of the future claw handle, draw one line in the middle and a second line perpendicular to it, connecting them in the center. At the intersection point we will later attach the stand. We place the prepared beam in the middle of the support, then we outline its boundaries for further placement of self-tapping screws or self-tapping screws.
- We connect the support to the beam using glue and fasten them with self-tapping screws.
- We either leave the block in its original form or cover it with fabric, cutting out a piece with a width equal to the diameter of the stand, adding a couple of centimeters for the seams.
- We tightly wrap a thick rope over the fabric, tying it in a tight knot at the bottom of the block. By the way, the rope can be painted in several places, then the scratching post will look much more beautiful. The rope can be put on glue if it does not hold well.
Floor scratching post
This model is convenient because it does not take up much space in the apartment, it can be rearranged and taken with you on the road. The most simple version of a floor scratching post is an ordinary board covered with carpet. You can also wrap a thick twine around the base.
When making such a nail polisher, the main condition is the weight and stability of the device so that it does not drag on the floor when the cat decides to sharpen its claws.
By the way, here you can read an article about how to make a house for a cat with your own hands.
INSTRUCTIONS FOR ASSEMBLYING A HOUSE WITH A SCRATCHING POT
The process of building a house for your beloved cat with a built-in scratching post must begin with creating a drawing - in the future it will help you better navigate the number of elements received and the order of their assembly. To mark, you must use a ruler, compass and pencil, and cut the parts strictly along the marking line.
Initially, you need to mark the walls and roof of the cat house, and mark a hole for the cat in part of the wall. I made it original by adding cat ears to the regular hole.
Then you need to start the most important and dirty process - cutting out the details of the future cat apartments. If you live in a private house, then it would be better to go outside and carry out all the procedures there. If this is not possible, then prepare a vacuum cleaner in advance.
There is nothing complicated in the process of cutting wood panels - the main thing is not to rush and cut strictly along the drawn line. After cutting, it is advisable to process the edges with a file and sandpaper - this will get rid of sharp edges and burrs.
When all the elements have been manufactured and processed, you can test assemble the house to ensure the correct dimensions and ease of assembly.
At the next stage, you need to cover all surfaces with carpet - this way the house will look much more aesthetically pleasing and will be much safer for the cat. In addition, cats show increased interest in decorated apartments: the softer and warmer they are, the more willing the cats will be there.
Important! When gluing carpet to a surface, you need to minimize the number of seams. The fact is that cats will pay close attention to each seam and play with it, which will ultimately reduce the service life of the entire structure.
The procedure for gluing on the carpet surface is as follows:
- Trying on fabric. It is necessary to lay the carpet on the part and try to wrap it, avoiding the appearance of unnecessary seams. It is optimal if they are located at the junctions of the elements.
- Cut out the fabrics. For cutting, scissors and a sharp knife are used. It is optimal if before this stage you mark the surface of the carpet with soap or crayons.
- Stretching the carpet into pieces. The fabric should be stretched as efficiently as possible: any tubercles and folds on the surface should be excluded. We check again that the seams are located at the joints or at the edges of the elements.
- Upholstery fastening. The carpet is attached to plywood (chipboard) using a construction stapler. It is important to choose the correct length of the staples so that they do not pierce through the base. Places of folds and joints of several sheets of carpet must be treated with hot-melt adhesive.
The internal and external walls of the house are sheathed in the same way. The main thing is that the edges of the carpet are secured to the ends of the wood board in two ways: using glue and staples. To upholster the inside of the house, it is recommended to use a single piece of fabric and leave the seam on the back wall.
Next, you should proceed to the final assembly of the house, following a certain sequence:
- Using self-tapping screws and furniture corners, it is necessary to fasten the walls of the house.
- Using the corners, attach the assembled house to the base.
- Then assemble the roof of the house.
- Holes must be cut in the middle shelves for subsequent installation of support posts.
- Completely assemble the entire structure according to the drawing, connecting all the elements with screws and corners.
Then you need to make a scratching post for cats. This is done as follows:
- Glue from a hot-melt gun is applied to the base of the bars.
- Several turns of rope are wound over the glue that has not yet hardened.
- We wait 5 minutes until the glue has completely hardened and the rope is tightly fixed.
- We wind the rope tightly around the beam until approximately its middle.
- We again apply hot glue to the area in the middle part of the beam and wind the rope tightly. We wait until the glue hardens.
- Next, we continue to wind the rope around the beam to the very top.
- We attach the last 3-4 turns of the rope at the very top of the beam with hot glue.
- We process the remaining supports in the same way.
At the final stage, all we have to do is construct a hammock for the cat and cover it with fabric. You can attach it to regular corners or to corners with reinforced stiffeners.
The main thing is to choose the screws of the optimal length and make sure that they do not go right through the shelves - sharp tips can injure your pet.
All that remains is to hang a piece of rope with a ball at the end between the floors - you will get an interesting toy for the cat. The resulting structure is quite massive and durable, and its base is wide; no additional fastening to the floor is required.
Why does a cat need a scratching post?
A cat, like any domestic animal, is by nature a wild creature endowed with natural instincts. Claws are an integral part of every member of the cat family.
With the help of claws, animals can not only climb trees, they need them to maintain balance when moving, during jumps and to secrete special odorous glands from their fingertips to mark their territory.
In addition, with the help of their claws, cats can fend for themselves in the event of an attack by another aggressive animal.
In the wild, cats took care of their claws to ensure their strength and maintain their shape by sharpening them on tree bark, stones, and dry grass.
A domestic cat does not need to hunt, but it is necessary to maintain the condition of its claws in any case, because if they are too long, it will interfere with the animal's walking and even cause him pain.
Without a scratching post, upholstery of upholstered furniture, carpets and wallpaper will be used, which is unlikely to bring joy to the owner. This is why it is so important to have a special device at home with which your cat can sharpen its claws.
About the dangers of declawing
Teaching a cat to use a scratching post requires a lot of patience and time. Many owners who do not want to burden themselves with raising a pet may decide to take such a step as onychectomy, i.e. removal of the claw phalanx (operation “soft paws”). By the way, you can read a separate article about this operation on our portal.
It is in this operation that people see the solution to their problems with an unruly animal, forgetting about the irreparable harm that is caused to the cat. Without claws, a pet becomes disabled, cannot move normally, and will have to literally learn to walk again, shifting the center of gravity from the toes to the heel. This is equivalent to cutting off a person's toes.
This operation has a detrimental effect on the pet’s musculoskeletal system, problems with internal organs are possible, not to mention the fact that declawing will completely “unbalance” the cat, making it insecure and fearful. Once outside, such an animal is unlikely to last long.
Fortunately, many veterinary clinics are categorically against onychectomy and refuse this service to owners who apply.
An excellent replacement for “soft paws” is the use of anti-scratch pads. Read about which ones to choose and how to put them on your cat correctly on our website.
How to train a cat to use a scratching post
As soon as a cat scratching post appears in the house, you need to attract the animal’s attention to the new thing. You can hang a toy on it on a string, a bow or a ball so that your pet notices.
When the cat approaches the scratcher, you need to praise it and stroke it so that the animal understands that the owner approves of its actions. You can carefully pick up your pet’s paw, place the pads on the surface of the scratching post and move it down so that the cat understands the principle of using the item.
If your pet has forgotten about the scratching post and is spoiling other things, there is no need to offend the animal or shout at it, you just need to calmly take it to the scratching post so that the cat understands that you can’t sharpen its claws there, but you can sharpen it here.
In some cases, you can resort to using a few drops of valerian on the surface of the device, then the pet will definitely not pass by.
Trying to wean a cat from sharpening its claws is impractical and unjustified, because... the animal will do this in any case out of natural necessity. You can either make a scratching post with your own hands, or purchase a ready-made one at a pet store.
Also read how to stop a cat from tearing up furniture and more.
Which is better - a purchased scratching post or a homemade one?
The range of scratching posts in pet stores is extensive: from simple to complex designs, from the cheapest (around 700 rubles) to expensive (3,000 and more).
The disadvantage of purchased scratching posts is that they are rarely stable. This is an important factor, because the structure should support the weight of a cat, even a large breed, if it suddenly decides to climb on it. In addition, the device must be made of strong and durable materials, and scratching posts from pet stores rarely meet these criteria.
For the sake of a high-quality and durable design for sharpening cat claws, the owner will have to shell out a lot of money, which many cannot afford. It will cost more to build a scratching post with your own hands from scrap materials.
Design with a house and a bed
This product is quite complex, so you should carefully read the step-by-step instructions for making your own scratching post. For work you will need boards, plywood or chipboard, jute or sisal rope, and glue. Next you should act in accordance with the recommendations:
- A stand is prepared from boards, plywood or chipboard. Wooden slats are nailed along the perimeter. The upper platform is done in the same way.
- Two support posts are attached to the stand, which are lubricated with glue and wrapped with jute or sisal rope. The workpiece must dry.
- At the next stage, the junctions of the bottom and side walls of the house are marked. A short column is attached to the bottom of the house, and a long one is attached to the wall.
- Next, the ceiling and remaining walls of the house are prepared, an entrance is cut out in one of them.
- All frame parts are glued together and secured with self-tapping screws.
- The top shelf is mounted on a support post.
At the final stage, the hand-made scratching post with a cat house is covered with furniture textiles. It is better to decorate the shelves with padding polyester or batting for softness. It is better to make the pad removable so that it can be washed.
Types of scratching posts
There are countless different scratching posts that a cat owner can choose for his pet, ranging from the simplest models to sophisticated and original products.
Pillow-shaped
A claw pad is the simplest and cheapest option. The surface is finished with felt, and the product itself is mounted on the wall. The downside of such scratching posts is that playful cats are unlikely to find this device interesting and will continue to scratch the owner’s furniture.
Wall mounted
Such scratching posts are convenient because they are ideal for small-sized apartments where the owner cannot afford to place multi-tiered complexes for the cat. A wall-mounted claw clipper should be wide enough and 2 times longer than the animal itself, but you can get by with more compact options.
Floor-standing
There are three types of these scratching posts installed on the floor:
- flat;
- combined with a bed and a house;
- columns.
These scratching posts are the most popular among owners. Flat ones are placed directly on the floor and are small in size, which saves space in the apartment.
With beds and a house, as well as posts, it is much more difficult. When purchasing or making your own scratching posts, it is important that the structure is stable and does not tilt or fall when the cat climbs on it.
A safe floor scratching post must be heavy and stable, otherwise it will have to be secured to the floor.
Corner
Convenient and practical. All the owner needs is to find any protruding corner in the house and allocate it for the cat. This model does not take up much space, but this is enough for the animal.
From table legs
If there is a catastrophic lack of space in the house, you can adapt the owner’s furniture into a scratching post, for example, make it right on the table leg, after wrapping it with thick rope or carpet.
In the gaming complex
For an entire cat family of 2 or more individuals, a gaming complex is the most win-win option. Such structures have several levels and floors, and there are toys that can keep a cat occupied for a long time. And for a pet who wants to climb higher, there is a high variant of complexes with a length reaching right up to the ceiling.
With shelf
A less intricate, but more economical option that is perfect for one cat is a design with a shelf on top of a post where the pet can rest. But such scratching posts are rarely stable, so the owner needs to take care of this point in advance.
Road
Mini versions of scratching posts are perfect for traveling. Most often, owners take flat devices with them, because... they don't take up much space. Small cone-shaped models are also suitable.
Original
People who want to pamper their pet with a unique scratching post that will stylishly fit into the interior of their home can turn to the craftsmen. They will make an original product and give it any look and purpose that the owner desires.
These could be scratching posts in the shape of a winding tree with hammocks for cats; devices that serve as both a claw holder and a floor vase; You can make a scratching post-cabinet, inside of which you can store any items.
If the owner has enough imagination and skill, he can come up with the design of the structure himself and bring the idea to life.
How to make a scratching post with your own hands
This type of design is the most common among cat owners. It does not need to be equipped with a house; it is a separate piece of furniture. You can make such an accessory entirely on your own, without spending a lot of money, effort and time. To make it, you will need a piece of chipboard, which will become its base. If you don't have one, an old countertop or any other flat piece of wood that is wide and thick enough will do.
You can choose almost any shape of the scratching post itself - square, oval, round, any other. The main requirement for her is to be resilient. The base is covered with jute, which is well secured on the sides, and then wound vertically, moving in a spiral.
The post itself can be made from PVC pipe, but a wooden beam with a cross-section of at least 10 cm can also be used. To give the structure massiveness and better stability, you can weight the base with additional weight.
Mistakes when making scratching posts
Owners often make mistakes and do not take into account some of the nuances when making homemade claws.
Firstly, the structure must be stable and reliable. If the scratching post starts to fall, the cat will quickly jump off it and will not be harmed, but, having been scared once, the animal is unlikely to approach this device again.
Secondly, many cat owners make the grave mistake of purchasing the cheapest and low-quality materials for a homemade scratching post, because they not only wear out quickly, but can also harm the pet’s health.
Thirdly, having made a scratching post, many owners decide that their work is finished, and the cat will figure it out on its own. If the pet is still small, it may be interested in a new object, especially if toys are placed on it.
The situation is more complicated with an adult specimen that has not previously sharpened its claws on a special device. Such an animal must be gradually accustomed to a new thing.
Do-it-yourself scratching post-house - diagram, dimensions, photo
[rek_custom4]
If you have all the materials, tools and certain skills, making a cat house will not be difficult. To make it you will need:
- wooden blocks;
- plywood sheet 18 mm thick;
- material for covering the bases and the house;
- electric drill;
- clamps;
- drill;
- braided rope or twine;
- jigsaw;
- screws and screwdriver;
- stationery knife;
- wood glue;
- miter box and wood saw.
Step-by-step manufacturing instructions:
- Saw wooden blocks along the length of the base.
- Using a drill for fastening the posts, make holes in the bottom area and under the screw head - countersunk.
- Glue the covering materials to the base. After the glue has dried, use a utility knife to trim off the excess edges of the trim.
- Secure the prepared bars around the perimeter.
- Using a miter box, cut out the bars at an angle of 45 degrees. In this case, there will be practically no gaps between the parts.
- All parts are attached using a screwdriver and screws.
- Pets like the house to be slightly elevated. To do this, one long and two short sections are sawn off from a round block. A platform will be installed on the long one, and a house on the short ones.
- Attach the pieces of bars to the base with screws that are screwed on the back side of the bottom platform.
- Twine or braided rope is wound around the posts. Its beginning is attached to the posts with screws and a washer.
- Using a jigsaw, cut out the parts for the house and the entrance, which is previously marked with a compass.
- Attach the parts to each other with screws and cover with material. To prevent the sheathing from falling and not having to be held, you can clamp the material with clamps.
- The top platform must be well secured, so a secure fastening will be required. To do this, blind holes are made in the blank for the platform in which the bolt heads will be hidden. Then a hole equal to the diameter of the round block is cut out on a smaller wooden plank.
- Using screws, connect the mount to the upper platform, then install and carefully screw it to the long bar.
The homemade scratching post-house is ready. To help your pet quickly get used to the new place and enjoy using the device, you can use catnip.