Treatment of diseases associated with damage to the skin, itching, suppuration, etc., requires keeping the skin dry and clean. This prevents the addition of a secondary infection and accelerates the regeneration of the skin. Of course, it is impossible to monitor your pet around the clock, so during illness and rehabilitation he is given an Elizabethan collar. How to choose it and how long does a cat need to walk in it?
History of the name, design and purpose of the Elizabethan collar
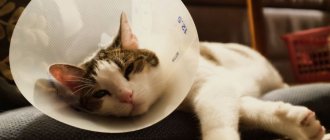
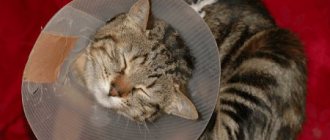
A device for protecting the skin from licking by a cat has many names: veterinary, medical, Elizabethan collar. The last name is most often used, because this design is similar to a lush accessory, which was especially popular during the reign of Queen Elizabeth I of England. The device is a cone-shaped structure made of dense material, the base of which corresponds to the circumference of the cat’s neck.
This device is designed to prevent the cat from licking healing wounds, stitches, etc., as well as to prevent the licking of veterinary medications in the form of ointments and sprays. A correctly selected and put on cone does not restrict the cat’s movements, does not cause him discomfort, and does not interfere with eating and drinking. Of course, the animal tries to remove it in the first days, but then gets used to it and does not notice it until the end of treatment.
Soft fabric collar
If your pet faces a long recovery period, it is best to get a soft protective collar. It is very easy to sew, and it will be much more comfortable for a cat or dog. This design does not interfere with sleep and does not rub the neck. It is very easy to fasten and can be washed easily.
It is better to make such a collar for a cat or dog from durable but hygroscopic fabric. Linen or thick cotton will do. To ensure that the “funnel” keeps its shape and protects well, you can use felt, non-woven fabric, or rigid mesh as a sealant. It is best to make a two-layer or even three-layer version. The protective collar with Velcro fastening is very convenient. You can put it on and take it off literally in one movement, but the animal will not be able to do this on its own.
To make a fabric collar, the pattern is made in exactly the same way as in the previous version. Two parts are cut out of the fabric and another one is cut out from thick felt or non-woven fabric. It is inserted inside to ensure structural rigidity.
The parts of the collar are sewn together, and the edges are finished using bias tape. The fastener can be made by sewing Velcro along the short sides. To provide additional fixation on the pet’s neck, you can stretch a cord along the inside or make loops into which the collar will be threaded, or you can leave it like that.
Indications for a cat to wear a protective cone
An Elizabethan collar is worn on a cat when:
- diseases of the ears and eyes - constant scratching and licking of medications interferes with recovery;
- injuries - to prevent infection;
- infectious and parasitic diseases - to avoid repeated self-infection;
- during abdominal operations, including castration, sutures must be protected from infections and mechanical impact with a rough tongue;
- treating skin and wool with external antiparasitic and antifungal drugs that have a toxic effect.
Which is better - a veterinary collar or a blanket?
The choice depends on the purpose of wearing: in the postoperative period after castration, it is better for the cat to wear a blanket, after antiparasitic treatment and in case of head injury, and also for a newly neutered cat - a collar.
The blanket prevents not only the pet from licking the seam, but also its contact with other objects. True, it gets dirty quickly and needs to be changed after each seam treatment. The collar does not allow the cat to wash itself and comb its ears, but it can prevent it from hiding in its favorite secluded place, which it especially needs during illness.
Blanket for a cat: instructions for making it yourself
If you are not satisfied with the described simple option for creating a bandage, then you can take a longer route and sew a blanket according to all the rules: starting with taking precise measurements and patterns and ending with creating the product using a sewing machine.
How to make a pattern
Sewing any product begins with taking accurate measurements, in this case measuring parts of your furry pet’s body. This stage should be taken with full responsibility, because even a small error in measurement can make the finished bandage very inconvenient and ineffective.
First of all, you should be interested in the exact length of the pet’s body (measured from the base of the neck to the tail), the distance from the front to hind legs along the stomach, the circumference of each of the legs and tail, and the volume of the chest.
After sterilization, the cat will need special care and special nutrition.
An even more complex modification of a homemade blanket is based on creating holes for the head and paws, but in this case, when using a bandage, you need to ensure that the fur is not pinched, the cat is comfortable, and there is no great impact on the diaphragm (there will be no breathing problems shouldn't).
Regardless of how you decide to transfer the measurements taken to the pattern, be sure to make the allowances necessary for stitching the edges.
Did you know? By hunting mice, just one cat saves about 10 tons of grain a year, so in England, these animals are specially used to guard food warehouses and even libraries. In Austria, after several years of service, pets are entitled to a lifetime allowance in the form of food (meat, milk and broth).
Cutting out the details
The blanket can be single-layer, two-layer or even three-layer, which will help make it denser and more durable. When choosing a material, it is better to give preference to non-fraying, natural and dense options that can withstand your pet’s claws and at the same time allow air to pass through the body.
As soon as you have such fabric, you can transfer the pattern onto it and, securing the paper with pins, proceed to cutting (do not forget to save the allowances). In an additional order, draw out the fabric for the blanket ties. Usually they require at least five, or even seven pairs: for the neck, front legs, in the middle of the body and in front of the hind legs. The product with ties is deservedly considered the most practical and easiest to create.
Find out how to make a house, toys, and scratching post for cats with your own hands.
Correct tailoring
Many owners have appreciated the benefits of a multi-layer bandage used for cats after sterilization. Making it yourself will be a little more difficult than a single one, but it’s worth it.
The topmost layer is waterproof and decorative, the middle one can be insulating (if, for example, the cat lives outdoors), and the inner one should preferably be made of soft and pleasant fabric (flannel or knitwear is best suited for these purposes).
The edges of the blanket and ties must be stitched along the edge, otherwise they may stick out in the future.
Important! Leave the tie strips as long as possible; they can be shortened a little during actual fitting.
One of the most important tasks when sewing a blanket is the correct placement of the ties, which we already mentioned earlier. With their help, you can adjust the size of the bandage to the parameters of your cat, so that it is comfortable for her to be in it during any of her activities.
How to choose a ready-made collar and how much can it cost?
To choose a good collar for a cat, you need to consider:
- Its correspondence to the size (neck circumference) of the animal. You cannot buy a product for growth. If it dangles around the neck, of course, the cat will take it off. A correctly chosen item does not restrict movement and does not put pressure on the neck: it is necessary that a finger can pass freely between it and the collar. Do not overtighten the collar or bandage to which the collar is attached, for reliability and strong fixation, so as not to provoke strangulation.
- Weight. The collar should not be too bulky and massive: such a device causes discomfort to the pet, preventing it from leading an active lifestyle. When making a product with your own hands from fabric, choose light but dense materials.
- Safety. Of course, it is best to buy a transparent collar that does not obscure the cat's view. If the choice falls on a fabric model, choose medium-sized products. When buying an item, you need to make sure that it does not have any odors or sharp edges - indicators of defects. If the edge of the collar is still processed carelessly, for the safety of the animal it is covered with tape or adhesive tape.
When choosing a collar, they are also guided by such factors as the presence of individual intolerance to certain materials and the approximate duration of treatment for the pet. To prevent cats from licking, they wear the following protective collars:
Plastic collar
- Plastic. The most popular type of collar. The product is made of lightweight transparent plastic. Its disadvantage is that it is the least comfortable for a pet among all models and the noise it makes when it comes into contact with other objects. The price of the product depends on the presence of additional elements: simple models cost 100–150 rubles, products covered with elastic or piping to protect against cracking cost about 350 rubles, with a collar – up to 1000 rubles. depending on size.
Soft Elizabethan collar
- Soft. This model is made of water-repellent hypoallergenic materials. The product is distinguished by its convenience (you can even sleep in it, so it is worn during a long-term illness) and affordable price (a simple model costs about 150–200 rubles, a collar-pillow with synthetic padding filler costs more than 1000 rubles), but also impracticality. While wearing it, it loses its shape and the pet reaches the wounds. Due to the opacity of the material, it is more difficult for animals to navigate in space in such a cone than in a plastic one.
Inflatable postoperative collar
- Inflatable. This model is also made of waterproof fabric, but its shape is supported by air chambers. The collar is characterized by the greatest comfort - it is comfortable for the pet to walk in it, it can clearly see the surrounding space, thanks to which it can be worn for a long time. The disadvantages of these products are the risk of damage from animal claws, so good models have an additional nylon coating, and the highest price among all types (a high-quality product costs more than 1,500 rubles).
DIY Elizabethan cat collar made from a plastic bottle
Factory-made protective collars for animals are quite complex structures, attached to the collar with special straps, with a large number of latches and Velcro fasteners. Or you can do this simple option:
It seems that in order to prevent the ointment from being licked off for half an hour, while the medicine is absorbed into the skin, all these sophisticated devices are not needed.
Note. Why do cats aggressively resist the application of ointments and lick the medicine from the affected areas?
In fact, the problem is not in the spreading process itself, but in the strong unpleasant odors caused by the ingredients of the ointments. Tar, sulfur and other strong-smelling medications lead animals into an excited, even aggressive state, and not at all the process of gentle stroking.
To calm your pet, before the procedure you can give the cat a few drops of valerian, which, by the way, will somewhat eliminate the untidy smell of tar.
The Elizabethan collar sold in stores is equipped with many latches and fasteners, much like various types of carbines and swivels in military ammunition.
To cope with all these complex devices requires a fair amount of skill and practice.
We offer a simple option on how to make a collar from a plastic bottle, made in a few minutes, which is put on and fixed with one hand (while with the other three you hold the desperately tearing, scratching and biting animal, which suddenly turns out to be surprisingly strong and nimble).
- Cut a thick plastic bottle (sheet plastic, about a millimeter or two thick, is even better). Ideally, from a piece of soft fluoroplastic that does not form sharp edges and cannot damage the pet’s skin.
- Put together a pattern that will roll into a cone-shaped shape with a slight overlap.
Pieces of Velcro are glued to the edges of the funnel with super glue, which will act as an instant fastener. The edges of the plastic may be sharp. To avoid damaging your pet's neck, cover the sharp cut edge of the collar with electrical tape.
- first option;
- second option;
- third option;
- all options.
DIY Elizabethan cat collar made from cardboard
A homemade protective collar made of cardboard is made similarly to the method described above.
The only difference is in the method of attaching the Velcro fastener - an adhesive connection here will not provide sufficient strength. It is better to sew Velcro to the edges of the cardboard collar using harsh threads.
Opinion. The option of securing an Elizabethan collar made of cardboard with tape sounds rather dubious from the point of view of manufacturability. Where can I get at least one more hand to operate with a roll of tape? And tape, according to Murphy's Law, in such situations always ends up with a lost end.
The cardboard protective collar is disposable, as it is severely damaged and dirty when used, and cannot be washed or cleaned. But the task of tearing the hated box collar to shreds will help distract the cat for the minutes necessary to absorb the ointment.
Advice. Before starting treatment and prophylactic procedures with cats, prepare first aid supplies - hydrogen peroxide, iodine, bandages. This is not for the cat, but to heal the owner’s wounds received in an unequal struggle with the pet.
Video on how to quickly make a protective collar for a cat from cardboard:
Video on how to quickly make an Elizabethan collar for a cat from plastic:
Installer of buttons on AliExpress.
How to put on a cone correctly?
The procedure is best carried out by two people: one person should hold the animal, and the second should put on its collar. The main thing is to do everything carefully and not to rush, so that the cat’s stitches do not come apart (for example, after castration). To put a protective collar on a cat, you need to:
- assemble the product following the instructions and attach it to the collar or bandage;
- place the pet on a flat surface and secure it with your hands;
- put on a collar with a collar and check whether it is too tight for the cat, then fasten all the elements of the structure;
- calm your pet down - give him his favorite treat, pet him and pick him up.
You need to keep an eye on the animal, as it can get stuck in narrow passages or cling to other objects. To avoid dermatosis, it is necessary to regularly check the skin of your pet’s neck for abrasions - this can happen if you use a rough collar, a heavy structure, or fix it with the same non-sterile bandage every day. Due to the fact that it is difficult for a cat to lick itself because of the collar, it is necessary to comb its fur more often.
How to wear?
There are times when the veterinarian did not put a collar on the animal or when you made one yourself.
In such cases, the question arises: “how to put it on correctly?” To do this, you need to follow some simple rules. First, you need to measure the cat's neck so that the collar fits. It should not dangle, but also not put pressure on the neck. Then prepare the collar. Attach it to a collar or piece of soft cloth. If the animal is scared, then take it, wrap it in a soft towel and calm it down. You need to put on the collar very carefully so as not to cause harm. Many animals do not like having foreign objects put on them, and cats can behave aggressively. In this case, you will need an assistant.
Then you will have to hold the cat by the scruff of the neck. Once her head is in the collar, try to calm her down. Then attach the collar to your neck. Check that nothing is pressing or loose. There should be a finger space between the collar and neck.
Making a postoperative cap with your own hands
You can choose a collar to suit every taste, but if it is needed urgently, and the owner cannot immediately purchase the device, it is made with his own hands.
Regardless of the material chosen, the main thing in its manufacture is convenience and safety for the pet, so you need to carefully follow the instructions and correctly take measurements from the cat. How to make a collar at home?
Rigid plastic bottle design
This is the most practical product that can be used throughout the entire treatment period. To make a collar from a plastic bottle, you need:
Soft stopper made of thick fabric or foam rubber
It is recommended to sew soft collars from natural fabrics so as not to provoke an allergic reaction in your pet. Instructions for sewing a soft collar:
How to make a leash for a cat from rubber bands
Preparing the cat for walks - making a harness
If you live in an apartment, keeping pets becomes much more difficult. It’s a little easier with dogs, put on a leash and take them outside. But for cats, a slightly different design is needed that will not embarrass freedom-loving animals, and this will be a harness for a cat. What is it and how can you use it? We invite our readers to figure it out.
We invite you to carefully examine this cat leash and understand its sewing principle. A cat harness is a cat collar that consists not of one rim, like in dogs, but of two. One ring is on the animal's neck, the second is in the middle of the chest. From above, to the bar connecting the two rings, the leash itself is attached.
Leashes are made from different materials and have different designs, but the principle of two rings is present everywhere. Some craftswomen make real masterpieces with their own hands. Here you can see a vest that covers part of the back and chest; some people make dresses for cats. The principle is the same as that of a vest, only a full skirt is attached or sewn to its bottom. You can even see the trim with beads and rhinestones.
Therefore, making a harness for your kitten with your own hands and at home is simple and fun. Plus, with the help of a vest, the animal will remain clean during the dirty season, because it is easier to wash a thing than a woolen friend.
First, let's look at the simplest leash for cats and figure out how you can make it yourself. It is very easy to put on, since the collars themselves are not solid, but are attached with Velcro and carabiners.
First you need to decide what material you can use to make a collar for a kitten. These can be leather or nylon straps, medium-diameter rope, fabric strips, especially denim. Further materials and tools
Source