DIY instructions
You can make an aquarium aerator yourself in 9 steps:
- Remove the seal located on the inside of the plastic cover. The lid will serve as the basis for the drum.
- Mark 2 holes on the lid with a marker with a diameter suitable for the plastic tube. Make holes in the marked locations.
- Cut a horseshoe-shaped piece of rubber to fit the lid. This will be a homemade valve for the compressor. Glue the piece to the inside of the lid, covering one of the holes.
- Cut the balloon lengthwise and place it on the bottle cap. Secure with tape. Thus, on the one hand, the lid will be tightened with a ball, and on the other, there will be holes in it.
- Mark a circle on a plastic card that is smaller in diameter than the lid. Cut out and glue a lollipop stick to it.
- Glue the other side of the plastic circle to the “drum”, onto the circle covered with the ball. The structure should hold tightly, it should not put pressure on the ball and pull the membrane behind it.
- Cut a piece from the hot glue stick and make a hole in the center and side. Insert a motor into the central hole and a wire into the side hole.
- Mount the motor on a wooden stand. Trim the tube attached to the drum so that it fits on the board.
- Fasten the structure. Connect the tube and motor.
This is one of many options for making an aerator. Some make more complex models for their aquariums with a cooler or battery-powered. You can place a silent compressor in your aquarium.
How to install
Connect the sprayer to the hose at one end and the other to the compressor. Place the hose and sprayer into the bottom of the aquarium or attach it to the side glass using suction cups. Install the device outside the aquarium above the water level, otherwise it will rise up the hose and damage the device. If it is not possible to position the aerator higher, add a check valve. For installation in water, centrifugal aquarium pumps are used. It is better to install the compressor next to the heater, this promotes better oxygen atomization.
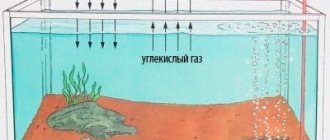
Principle of operation
The motor sets the membrane in motion. Air enters the drum through the valve. At half a turn, the device supplies air through its tube into the home pool.
Required sizes
The devices are universal and compact. The sprayer can be selected in different sizes and shapes, and the hose can be of any length. Aerators with small sprayers are suitable for small containers.
Manufacturing instructions
How to make a compressor for an aquarium with your own hands? In fact, anyone can handle this task. The easiest way to create it is based on a pear or camera.
Simple option
To create this design, take an air reservoir, for example, a wheel chamber, tubes and clamps from droppers, a pump and a tee.
- Cut the IV tube into three lengths. Make one of them a little longer - it will fall into the container.
- For a long piece, seal the edge with a lighter and make many holes at its tip using a needle. To prevent the air duct from floating, tie a small weight to its tip. Place a clamp on the same section.
- Connect all three sections of the tube using a tee and secure them with clamps.
- Attach a bulb or pump to one of the two sections, and an air tank to the other. Attention: also attach the clamp from the dropper to the hose that goes to the bulb.
- Use a pump to pump air into the air tank and shut off the inlet flow. Lower the long hose with holes into the aquarium and open the outlet flow with a clamp from the dropper.
Your device for supplying air to the reservoir is ready. You can regulate the flow using the clamp from the dropper. You will have to pump it a couple of times a day - it all depends on the size of the air tank.
Battery operated with cooler
A compressor may also be needed in the aquarium when transporting fish. But what if the device from the store is powered by the network, and the homemade design is too large? But there is a way out: you can make a battery-powered device.
- Take a small plastic bottle, an electric motor, a cooler, an IV tube, and glue. You will also need wires, batteries and a socket for them, and a power button. Cut the bottle into two halves.
- Using a soldering iron, attach the wires to the motor, and attach the cooler to it. Secure the resulting device with superglue inside the bottle.
- Attach a tube with a sealed end and many small holes in the bottom to the neck of the bottle.
- Attach the button and battery socket to the wires and cover the other half of the bottle.
A device made in this way will help out not only on the road. It will also be very helpful when the lights in the house are turned off.
12 volts
When creating your own based on an electric motor, it is advisable to use a 12 volt motor. Then, if the power goes out in the house, you can even connect it to a car battery. Under normal conditions, it operates from the mains using a power supply.
Attach a regular eccentric to the motor shaft and attach a pump to it - for example, a syringe or a homemade device. The shaft will move the piston, and it will pump air.
Silent
A homemade compressor for an aquarium can be quiet. To do this, a conventional device simply needs to be hung inside the jar. To do this, make three holes in the lid: one for the air duct, the second for the wire, and the third for the hook on which you will hang it. Assemble the structure and enjoy it to your health.
In fact, an absolutely silent compressor is a legend. But this method will significantly reduce the volume level of this device.
Sorry, there are no surveys available at this time.
DIY aquarium sprayer
Aquarists place air diffusers made of stone or rubber in their aquariums. Rubber sprayers are suitable for large aquariums due to their structure. It can be distributed over the bottom. An aquarium sprayer, like a compressor, can be made with your own hands. You will need a short rubber wire. Make holes on different sides and close the free end tightly. You can make holes in the hose without putting on the sprayer.
Those who wish can place a sprayer made of porous limestone or myotis in their aquarium. Remember that stone sprayers slightly increase the hardness of the water and are also noisier in operation.
Video on the topic
Watch a video about aquarium aeration:
If you increase the temperature of the water in the reservoir, you can increase the oxygen consumption of the living creatures inhabiting the reservoir. This also works in the opposite direction. In case of asphyxia, you can quickly help the fish. Underestimate the importance of aeration in an aquarium. You can choose a small and high-quality device for your pond with the help of specialists. Remember that an aquarium can only be beautiful when all its inhabitants are healthy.
- Related Posts
- Aquarium care: how to change the water and what to do with fish and plants?
- Why does the life of fish depend on the preparation of water in an aquarium and how to do everything correctly?
- What is pH in aquarium water and how can you influence it?
Silent compressor for aquarium
You will learn how to easily make a compressor for fish from an aluminum can by watching this video.
An air compressor is a device designed to provide aeration of water and enrich it with dissolved oxygen. This device is simply necessary for a home aquarium, since a glass pond is a closed space in which fish may lack oxygen.
The device operates as follows:
- Compressor tubes immersed in water intensively release air bubbles, which enrich the water with oxygen molecules. The air pressure is regulated by special valves and clamps.
- When the device operates, ripples appear on the surface of the water, which increases the area of interaction between water and air, which contributes to additional saturation of the water with oxygen.
The compressor mixes layers of water in the aquarium, preventing it from blooming and spoiling. The operation of this apparatus is called aeration. Its main purpose is to provide the most favorable habitat for fish and preserve their health.
To aerate the aquarium, sprayers, most often made of white grindstone or an abrasive substance, are attached to the air tubes. Located at the bottom of the aquarium, they emit a lot of air bubbles, creating a very beautiful decorative effect.
The smaller the size of these bubbles, the larger their total area, which is more favorable for aeration of the reservoir.
The compressor should not be used constantly. It is quite enough to turn it on twice a day for about 20 minutes. In the summer, when the air temperature rises, the water also heats up and wastes oxygen much faster, so the device should be turned on more often and for a longer time.
An aquarium pump is often used to saturate the water with oxygen. This small device has 2 functions - saturating water with oxygen and purifying it. The pump is purchased for large aquariums. This device does not make much noise because it is submerged in water. The only thing is that a slight specific whistle is produced by the tube for sucking air from the surface.
If you know the basic operating principle of the device, you can assemble it yourself. First, the compressor takes in air and then gradually supplies it to the aquarium.
In order to assemble such a device, you need to prepare:
- rubber chamber;
- hand or pedal pump;
- tee (three-way tap);
- a plastic tube from a medical dropper, always with a clamp.
To make a compressor, we take three tubes from the tee: the first - to the hand (or pedal) pump, the second - to the rubber chamber, the third, made from a tube with a clamp, will be used as a hose from which air will flow into the aquarium. We firmly plug the end of this tube with a stopper, and in front of it in the tube itself we pierce several small holes with a needle. This is where the air will come out. It is important to ensure that all connections are tight and secure.
The principle of operation of such a homemade compressor is as follows: first, a tube leading from the pump to the chamber will be used to collect air. Then, when the air is collected and the chamber is filled to capacity, this tube will stop working and another one leading from the chamber to the outlet tube will begin to function.
In principle, the compressor is made by hand. The disadvantages of such a device are that the battery chamber needs to be periodically pumped up. For normal aeration of an aquarium with a volume of up to 100 liters, such pumping is carried out approximately twice a day. Therefore, a homemade compressor cannot be left unattended for a long time.
We invite you to familiarize yourself with: Fawn Orpington chicken breed