/ Hamsters / Making a hammock for a hamster with your own hands
0
2943
Article rating
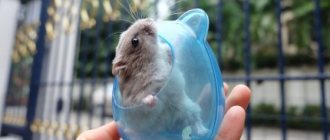
Hamster owners are always trying to make their pets' lives more comfortable and fun. There are special toys for them, leashes for walking and labyrinths. There is also a hammock for a hamster. It is also important that you can make such an accessory yourself.
Making a hammock for a hamster with your own hands
Hamster toys
Hamsters in nature are forced to spend a lot of time searching for food and fleeing from predators. They don't have time for special games. In captivity, animals often become overweight due to their conditions: small cages and insufficient equipment.
Therefore, in order to create ideal conditions for animals, it is necessary to properly equip the cage and fill their leisure time with special devices. Since it is unwise to put hamsters in danger by having a predator, toys should work in two directions:
- searching for food;
- physical activity.
For the first, grass balls in which a treat is buried, various types of sandboxes and structures with seeds inside are suitable.
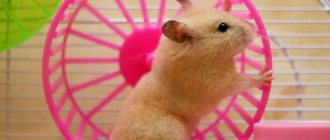
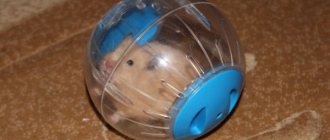
Physical activity will be developed: tunnels and labyrinths, ladders, a running wheel and just boxes with several holes inside. For walks outside the cage, you can make a walking ball with your own hands.
DIY guinea pig hammock
Make sure there is nothing in the cages that could pose a choking hazard (such as small toys). But, if you want your rodent to have a large and spacious home, you can make it yourself. You can make a multi-level, L- or U-shaped house for a guinea pig, arranging the rodent's house at your discretion. When making a cage for a guinea pig with your own hands, follow the principle - the bigger the better! For an active life, rodents need a large space.
Insert the finished metal frame into the cardboard base of the cage. You cannot keep them in an aquarium - the humidity level is too high, and an ordinary lattice cage will not work: it will not protect against temperature changes and drafts. The optimal size of a cage for a guinea pig is 40x60 cm, for a pair of pets – 50x80 cm. It is imperative to equip the cage with a tray; choose a plastic one with a height of 12 centimeters.
Homemade toys for hamsters
Leisure devices for animals can be made from available materials. The main thing is that they are safe for animals.
From walnut shells
It’s quite easy to make a toy from walnut shells. Take a few nuts, split them in half and remove the inside. To work you will need:
- several shells;
- strong thick thread;
- thin nail;
- hammer;
- washer.
Make a hole in the middle of each shell by driving a nail into it. The nail must then be removed.
Thread the thread through all the shells. They should all “look” in one direction except the extreme one. You need to tie a washer to the end one so that the thread does not slip out.
The result was nut “beads”. Tie the top of the string to the cage. Place a treat in each shell. The animal will climb the shells, like a ladder, and pull out the treat.
Do not make this “ladder” very high - just a few links. Hamsters are excellent climbers, but they tend to fall down, so provide a thick layer of bedding.
From a toilet paper roll
This toy is well suited for Djungarians; larger Syrians will deal with it quickly enough. You will need scissors, a toilet paper roll and a treat. To do the job:
- cut the roller into equal rings;
- connect the two rings together by inserting one into the other;
- insert another ring into this ball;
- complement this design with rings until a dense ball is formed, about 5 rings will be needed in total;
- Place a treat inside the homemade ball.
This entertainment will be enough for a dwarf hamster for a long time. He will roll this ball, nibble on it until he gets to the “yummy”.
Minks and "diggers"
It’s very easy to make minks by hand - toys for hamsters and dwarfs will love a box of cookies or napkins with holes in it. A box with holes can be placed in a cage, or buried entirely in sawdust. In this case, the holes will need to be made from the top. If the box is completely covered in sawdust, the animal will satisfy its need to dig.
Provide the animal with a container of sand; it will happily rummage through it. If a treat is buried in the sand, the baby will be preoccupied with finding it.
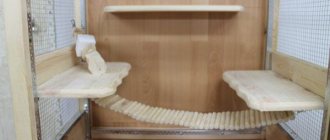
DIY hanging structure for chinchilla
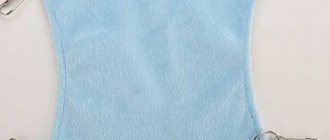
A hammock for an animal is a very simple design, which consists of a piece of fabric and 4 ties. Attached to the bars of the cage. It is easy to make a drawing for such a device. On a square 450 by 250, arched sides are made using a pattern of the required size.
The necessary tools and materials are prepared in advance:
- textile,
- scissors,
- sewing machine,
- needle,
- threads,
- wire,
- pencil.
A hammock is made as follows:
- The fabric is folded in half. A suitable material for making a bed is fleece. His animals gnaw less.
- A pattern is placed on the material and outlined with a pencil. The fabric is cut along the drawn lines.
- The sides of the part are sewn together on the sides. There remains a small unsewn area.
- The hammock turns right side out. The open area is sutured by hand.
- Holes are made in the corners of the part using small scissors.
- Cut 4 pieces of wire of the required size.
- The wire is threaded through the holes, folded in half and twisted. There is a hook at the end.
Another fastening option is the use of eyelets, chains and carabiners. They are inserted into the hole made with scissors and flattened using a hammer and pliers.
Not all chinchillas are suitable for hammocks made of fabric. Sometimes they chew through a fabric bed. For such animals, cradles are made from other materials. A safe option is a hammock made from an old washcloth.
If there are two animals in the house, then you can make a two-tier hammock.
Old jeans can be used as material for a hammock.
Other DIY activities for hamsters
Various objects can occupy children's leisure time. Wooden toys from which paint and varnish have been removed will serve as objects for grinding teeth - rodents also need this. Wooden branches and blocks that you collect in the forest will also please hamsters. Fruit tree branches can be used if they have not been treated with chemicals.
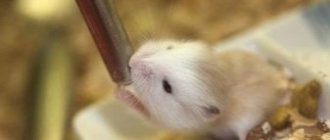
Large pieces of pet-allowed fruits and vegetables in the cage are sure to keep the little ones occupied. It is necessary to remove these fruits in the evening, otherwise they will begin to spoil.
The most ordinary objects that are in every home can become toys. A toilet paper roll and a small flower pot are toys for Djungarian hamsters; for larger relatives, a set of children's plastic or wooden cubes and larger flower pots are suitable.
Ropes, ladders, bridges, slides
Rodents love to climb; they hold on well to ropes and crossbars. Unfortunately, it is difficult for them to go down - they fall and can injure their paws. The task of the rodent owner is to make the entertainment as safe as possible. If you want to make a toy for a hamster with your own hands, consider the height of the structure. The homemade rope should be attached low, the stairs should be flat, and the slides should be safe.
Video: how to make a slide for a hamster with your own hands
A ceramic pot can be used as a slide.
It is very easy to make a ladder from cardboard. Cut out 2 rectangles of the same width. One will serve as the base of the ladder, from the other you need to make steps. Take the second rectangle and cut it crosswise into narrow, identical strips. Glue these strips onto the first rectangle at small intervals. Attach the ladder to the house or shelf.
A convenient bridge can be made from ice cream sticks. Prepare about 30 sticks, PVA glue, a large bowl, clothespins. The procedure is as follows:
Video: how to make a bridge for a hamster with your own hands
How to make a ladder for a hamster
Hamsters are very mobile and active animals. They need daily physical training - this is one of the building blocks of your pet's health. To carry out such training, provide your pet with sports equipment. Previously, we looked at how to make a silent hamster wheel with your own hands and how to make a swing. In this article we will look at how to make a ladder for a hamster with your own hands. The ladder will be wooden and will also be suitable for other small animals, such as guinea pigs, and even parrots. Completing the task will not be difficult, and step-by-step instructions with photographs will make your work even easier.
Materials needed to make a hamster ladder
To make a wooden ladder for a hamster, you will need:
- non-toxic wood glue (for example, PVA);
- 4 wooden barbecue sticks or any other suitable size (9x4x365 mm - approximate dimensions);
- pencil;
- sharp knife;
- ruler.
Step-by-step instructions on how to make a ladder for a hamster with your own hands
Step 1
Take 4 barbecue sticks and cut off the pointed ends using a sharp knife.
Step 2
Now take two cut sticks and cut each into 4 pieces of equal length, use a sharp knife, pencil and ruler for this. You should end up with 8 identical pieces.
Step 3
Now all you need to do is: mark 2 long sticks into 8 equal pieces each (don't cut them off). Then glue the 8 previously prepared short wooden pieces to two long sticks along the marked lines.
Step 4
Take a break. After gluing the sticks, you will have to wait about an hour until the glue dries. After the glue has completely hardened, a wooden ladder for a hamster made by yourself can be considered ready. Now your pet will be happy.
Another option on how to make a ladder for a hamster with your own hands
Find a piece of wooden board that matches the size of the future staircase (ramp) for the hamster. The surface must be well treated and free of burrs - this will protect your pet from getting wounds. Parquet boards or laminate are good for these purposes.
Take a small cross-section of wood, thin bamboo split in half is ideal, and cut it into pieces the width of the wooden board.
Using non-toxic glue, glue these pieces onto the board at regular intervals, approximately 2-3 cm.
It is advisable to attach a metal plate or hooks to the top of the resulting ladder to ensure that the finished product is hooked to the cage.
Rate this article: Rating:4.40/5 (5 votes)
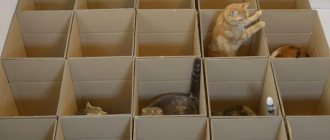
Playground
The animal's play area can be organized outside the cage. To do this, fence off an area of the room with cardboard boxes, connecting them with tape. Be sure to check the reliability of the design so that you don’t have to catch your baby throughout the apartment.
On the playground, place various toys and any household items that are safe for the animal. Observe the animal, which toys it likes best. Equip the playground with ladders, a wheel, bridges, a sandbox, a rope and flower pots and children's toys. Some of them can then be transferred to the cage.