3.9
(10)
All natural bodies of water are cleaned naturally. A closed ecosystem independently maintains the necessary balance. Rivers and lakes contain large colonies of beneficial bacteria, as well as various natural filter materials. Aquariums also require filtration to maintain cleanliness. However, it is often carried out exclusively mechanically.
Of course, this type of cleaning is also quite useful, but if we talk about efficiency, the best option is an internal or external biofilter. An aquarist should not rack his brains, since nature has long thought of everything for him. The main thing is to simply implement the natural biological process at home, which is relatively easy to do.
Why do you need a biofilter?
There are several types of cleaning. The most common is mechanical, but there are also chemical and biological types. Scientists believe that it is the latter type that is considered the most important and necessary.
This is explained by the fact that in every aquarium there is organic matter left behind by fish and other inhabitants. Decomposition of feces, food residues, plant leaves and gases exhaled by animals provoke the release of ammonia. It poses a huge danger to all living creatures living in the home underwater world.
At a concentration of 0.2 mg/l, ammonia will kill all fish, and for some varieties the dangerous indicator is 10 times less. Accordingly, the aquarist needs to carefully monitor such biological processes and avoid situations where animals may suffer.
Ammonia can be dealt with in various ways. The simplest is regular water changes. They are held weekly, but not more often. Such procedures are very stressful for the inhabitants of the aquarium and, in addition, they can upset the fragile balance of the home ecosystem.
Therefore, the best way to deal with ammonia is through beneficial colonies of bacteria that oxidize it, thus converting it into nitrites and then into nitrates. The latter, of course, in certain concentrations can also cause harm to animals, but they are also a nutrient for natural plants.
This is the principle of biological filtration. It takes place in several stages:
- Fish leave behind waste products;
- Feces, food scraps and leaves decompose, releasing ammonia;
- Bacteria process them;
- The resulting nitrate is absorbed by living plants.
Bacteria independently form in the aquarium during the nitrogen cycle. They live in water, on walls, on decorations. They help maintain the necessary balance, but sometimes it happens that these colonies are not enough, and then ammonia still accumulates, poisoning all the animals. In this case, the task of the aquarist is to multiply microorganisms so that they can cope with high biological loads.
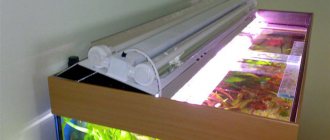
We recommend reading the article: How to choose lighting for an aquarium
What does it consist of and how does it work?
A biofilter for an aquarium is an original device that is easier to assemble yourself, at home. Of course, there is equipment from manufacturers. However, regardless of type, they perform several types of cleaning. Most often this is a biological and mechanical type, but aquarists also additionally purchase chemical fillers (activated carbon, zeolite).
That is, in such devices the biofilter is only one of the components, albeit the predominant one due to its importance. However, in some cases, only biological filtration is needed. Then it’s easier to assemble the device yourself.
There are several varieties of such filters, differing in housing type, fillers and other characteristics. But, regardless of this, they all have a simple principle of operation:
- Take a container;
- Fillers are poured into it (soil, expanded clay, foam rubber, ceramic rings, foam glass, etc.). They necessarily have pores in which colonies of beneficial bacteria populate over time;
- A hose with a working element that creates a flow is connected to this body (most often a compressor is used);
- Water flows through the biofilter fillers, and at this moment the microorganisms living in the container process hazardous compounds;
- Water that is already purified and safe for fish enters the aquarium, and the remaining nitrates in it are absorbed by the planted living plants.
We recommend reading the article: Why does the water in the aquarium become cloudy?
How to make a pump impeller
The manufacture of the pump impeller for the aquarium deserves special attention. Here you will need to take a plastic plug of slightly smaller diameter than the glued ones, and then make four cuts in it along the edges to install the plastic blades.
The edges of the blades should protrude slightly beyond the edges of the plug; this is an important condition for the effective operation of a homemade pump. Then a hole is made strictly in the center of the plug for the engine shaft. After which everything is glued together using glue and a heat gun.
Thus, after spending just a few hours, you can make an aquarium pump with your own hands. Of course, it will also be possible to modernize it. For example, install a fourth piece of plug with a piece of cotton wool on the water suction pipe. This can make a good filter system for an aquarium.
Types of filter materials
Modern biological filters use a variety of fillers. Each has certain characteristics and, accordingly, advantages and disadvantages. Aquarists mainly use:
Foam rubber or synthetic winterizer . Perhaps they are the most common. This is explained by their versatility and effectiveness. First of all, they provide mechanical cleaning. They retain feces and various solid impurities. But at the same time, bacteria also settle in them. They are usually installed in internal biofilters. However, this option is not suitable for large aquariums, since it is not able to cope with a large load and gets clogged quite quickly;
Bioceramics . Also quite a popular filler. Often present in the basic configuration of external canister-type filters. Their properties make them optimal for outdoor equipment. They disperse oxygen perfectly, and in addition, colonies of bacteria easily settle in them. In addition, they do not carry out mechanical cleaning, and accordingly, contaminants do not linger in them, and therefore they need to be washed extremely rarely;
Plastic . You can often find filter materials such as plastic balls in stores. They have a ribbed surface. Microorganisms grow in it, and thanks to the cutting of the water flow, all these pores are saturated with oxygen, necessary for invisible biological cleaners;
Glass . Recently, porous glass has become in demand. It is manufactured using special technology. Thanks to it, the output is balls 8-12 mm in diameter. Bacteria quickly appear in them, processing dangerous compounds in aquarium water.
Differences between internal and external regulators
Before installing a filter in the aquarium, you need to decide which one to choose. Internal installations are attached to the glass with suction cups. External - located outside. They draw water through a tube that is immersed in the aquarium. Comparing the characteristics of filters, I would like to note that external regulators look preferable for the following reasons:
- the quality of cleaning is much better;
- the filter does not take up space inside the tank;
- the underwater world without internal structure looks much more aesthetically pleasing.
Also, the external filter is easy to maintain. Cleaning and rinsing do not need to be done in the shortest possible time. Such a regulator does not require a specific type of filter material. You can use different components and place them in separate baskets or containers for fillings. The effectiveness of an external filter has been proven by aquarists for a long time. Due to the uniform distribution of water and the large area of filter materials, the cleaning process occurs with the highest quality. To install it, you do not need to lift the lid of the fish tank; it does not spoil the overall appearance of the aquarium. To turn off the system, it is enough to simply turn off the taps, while the internal installation will have to be removed directly from the tank, which will cause anxiety to its inhabitants.
Popular brands of biofilters
If desired, the aquarist does not have to make his own filter. He has the opportunity to simply purchase ready-made equipment that will ensure high-quality cleaning of the aquarium. It is impossible to list all the options available on the market, so it is better to focus on a few of the most popular brands.
Tetra EX
Perhaps every aquarist has heard about this manufacturer at least once. Its products are known for their high quality, because the German company carefully controls production processes.
Filters from Tetra are no exception, and they have been in demand among lovers of underwater flora and fauna for quite some time. This equipment provides high-quality cleaning of aquariums with a volume of 60-500 liters. As a rule, ceramic rings and biological balls are used as standard.
Before connecting, be sure to read the instructions. The assembly diagram will be indicated there. We recommend that you pre-rinse all fillers under the tap (they probably contain dust and small fragments formed during transportation).
In order for the equipment to work, you must independently create a flow draft. This is done using a special pumping button located on top of the case.
JBL
Another well-known German manufacturer specializing in economical filters. All of their biological filter models use bioceramics. In them, water enters from above, passes through mechanical cleaning fillers, and then returns back through the biological substrate.
The equipment is prepared in the same way as with Tetra.
Aquael
The Polish company is known for producing budget filters. But, despite their low price, they are distinguished by high performance and reliability. The model range includes equipment for aquariums with a volume of 100-700 liters. The most powerful devices have two pumps and four hoses (for drawing in and releasing water), thanks to which it is possible to achieve a stronger flow and mixing of water. Ceramic rings or biological balls are used as fillers.
Common mistakes
It often happens that you cannot assemble the filter yourself. If the unit does not fit tightly into the housing, then most likely the filtration baskets are overfilled or incorrectly placed. Sometimes the drainage holes are not aligned correctly. It happens that the rubber gaskets do not fit into their grooves.
The causes of filter leakage can be:
- The device head clamps are not tightly closed. This can happen due to the usual carelessness of the master. The human factor takes place in any field of activity. Fixing the problem is not difficult - just tighten the clamps more tightly.
- Gasket/seal contaminated. Of course, this will not happen in a newly assembled filter, but this happens in operating installations. The rubber seals must be cleaned of mucus and dirt, preferably lubricated with Vaseline or another substance. To avoid this problem, it is important to check the system status once a month.
- The gasket is not inserted correctly.
If the external filter does not work, the first thing to check is whether the system is connected to the mains. It often happens that someone accidentally pulls the plug from the socket. If this does not help and the filter does not work, you need to check the condition of the pump or rotor. Sometimes a pebble or snail shell interferes with the normal functioning of parts. If the system is not pumping water, it may simply not be there. Without fluid, the external filter will not work. Before filling with water, the unit must be disconnected from the power supply. If the filter has reduced power, the system tubes and hoses may be dirty. You need to check their appearance, see if they are twisted. Contaminated filter materials can also interfere with efficient operation.
There are two types of filters: external and internal. How to choose the one that is right for your case?
First of all, pay attention to the size of your aquarium. If it is big enough, then there is not much difference. But usually we have only limited areas in which to place either a small or medium-sized aquarium. It is in this case that it would be appropriate to use an external filter.
Unlike the internal one, the external filter is not installed directly into the aquarium, but outside it. This helps to save a lot of space.
The external filter does not take up space in the aquarium and does not spoil its overall appearance
The operation of such a device is as follows: water from the aquarium enters the device, passes through the filter elements, and then returns back to the fish.
An external filter has the following advantages:
- it does not take up useful space inside the aquarium;
- the contents of the aquarium look more aesthetically pleasing without such devices;
- Filter media purify water better.
Of course, among the huge range of such devices, you can choose the one that suits all your needs. But their prices are also too high. So why not take the opportunity to make an external filter yourself? This idea is easy to implement. It turns out that everything you need can be easily purchased in stores and on the market, and the assembly and installation work itself is simple enough that even a beginner can handle it.
How to care for an aquarium filter?
For the filter to work properly, it must be cleaned
. Otherwise, it will begin to work worse, and then completely pollute the aquatic environment (the latter applies to internal filters).
The smaller the filter area and the larger the water volume, the more often the filter needs to be cleaned.
To determine how often you should clean the filter, you should not only carefully read the manufacturer’s instructions, but also observe the filter in operation. If it starts to work weaker, then it’s time to wash it. Small filters may require weekly cleaning, while larger models may require one cleaning every 2 months.
To avoid destroying the colony of beneficial bacteria, wash the filter with water at room temperature and do not do it too thoroughly. In addition, you should not wash the filter if you change the water in the aquarium, add new fish, or introduce new food, otherwise you will upset the established balance in the aquarium.
Replacing the washcloth
in the filter - another important point. You shouldn't do this too often. Wait until it begins to lose its filtering ability and shape. In addition, in the internal filter, the washcloth consists of several parts, and only one of them needs to be changed at a time, so that subsequently beneficial bacteria from the “old” parts quickly spread to the new ones.
Remember that the filter in the aquarium must work constantly and without interruption, so choose a suitable model responsibly and do not chase the cheapest option. Opt for high-quality equipment that has proven itself and will serve you for a long time.
As an aquarium hobbyist with little experience, I came to the conclusion that the internal filter in my aquarium was not doing its job. And only the inhabitants of my aquarium suffered from frequent filter maintenance.
Having studied the information on filters, I came to the conclusion that the clear and correct solution is to use an external filter. Biofiltration is extremely effective, and no method of water purification can even partially replace it.
The composition of water purified by an external filter is approximately similar to water from slow-flowing natural reservoirs. When a third of the volume of the main aquarium is refreshed weekly, we can assume that the ichthyofauna and hydroflora are contained practically in flowing natural water - hence all the successes achieved in systems with biofiltration.
The bad news for me was that the cost of the external filter turned out to be commensurate with the cost of the aquarium itself.
Having become familiar with the design of the external filters, I decided to make my own analogue of the external Eheim filter.
To make a homemade external filter, we purchased:
— Pump (fountain pump), RESUN, made in China, 30 W, 2000 l/h. — PVC coupling for sewer pipe d=200 mm. + 2 plugs for it, - taps, corners, bends, etc., - PVC pipe d=20 mm. for receiving and supplying water to a 4 m aquarium, - a flask from a household filter, - filter fillers.
To insert into the plugs, fittings of the following design were used.
I chose this pump due to the fact that the filter has many kinks in the tubes and the final performance eventually dropped by half.
I drilled holes in the top and bottom plugs for supplying and pumping out water. When installing the fittings, I used rubber gaskets with the additional use of silicone sealant.
I tried to insert the plugs into the coupling with sealing rubber bands and I couldn’t do it, it was too tight. Realizing that even if I manage to insert the plug, I won’t be able to pull it out. Based on this, I cut off the edges of the coupling so that when disassembling the filter, if anything happens, you can remove the rubber band and thereby depressurize the filter. At the bottom of the coupling I made a seat for the inlet fitting.
The cut edge of the coupling will later be installed inside the coupling and will hold the mesh.
A mesh is installed in the lower plug above the level of the fitting. To do this, I had to beat up the vegetable drawer.
After this, with a clear conscience, we can install the lower plug into the coupling. Since sealing gum will not be used here, be sure to coat the entire area of the plug with silicone. And after installing the plug, we additionally coat the joints inside and outside with sealant.
I additionally drilled a hole in the lid for the power cable and air vent. There was no need to attach the pump to the plug; it was already securely secured using a piece of hose and a power cord.
To seal the power cord, I used a fitting similar to the one used in street lamps. I installed a switch in place of the broken wire.
Under the inlet pipe, I installed a bracket for attaching a household filter flask, which will serve as a pre-filter for coarse cleaning. It would be possible to do without it, but then you would have to install a sponge on the inlet pipe directly in the aquarium, or wash the canister every month (in my plans, the canister will be washed at least once every 6 months).
For the production of pred. The filter required a PVC sewer pipe d=32 mm. In which many holes were drilled. It could be used, additionally, in the previous one. activated carbon or zeolite filter, but first I decided to make do with a foam sponge.
When all the filter parts are assembled, we begin filling with fillers.
1 layer.
First of all, we arrange the material for coarse filtration at the bottom. Foam rubber with a large cell is most suitable for these purposes. But unfortunately I was unable to find sheet foam rubber for aquariums of a suitable size. And instead he used what looked like a wad of fishing line.
2nd layer.
Fill with ceramic rings. The purpose of their use in a filter is to branch water flows and uniformly distribute its current over the entire transverse area of the filter material.
3 layer.
We lay a layer of foam rubber with a small cell. In my case, padding polyester was used.
4 layer.
We fill the substrate with “bio balls” for colonies of nitrifying bacteria. All the mysteries of the nitrogen cycle take place in this section. Here heterotrophs, nitrifiers, and denitrifiers coexist peacefully, regularly fulfilling their duties; The working volume of the chamber should be 4/5 of the capacity of the biofilter housing. Expanded clay (preferably crushed) can be used as a substrate for bacteria because it has a porous structure.
5 layer.
It's not required, but I decided to add FLUVAL substrate. Outwardly, it looks like ceramic rings, only the material has a porous structure. If you take a ring in your hand, plug the hole on one side with your finger, and blow into it on the other, then all the air will come out through the micropores
6 layer.
The final layer, directly in front of the outlet intake hole (i.e. in front of the filter pump), should be placed with synthetic padding. It will protect the rotor from dirt particles getting into it.
The homemade external filter for the aquarium is ready, the assembly was successful. Testing showed that the pump performed quite well, although the performance characteristics of the pump turned out to be 2 times less. The top cover is not fully installed due to the strong tight fixation of the sealing rubber. If you close the lid all the way, it is quite possible that you will not open the filter again.
Filter maintenance boils down to cleaning the prefilter as it gets dirty. Opening and washing the canister after half a year. I would like to note that only ceramics and foam rubber need to be washed in the filter, and always with aquarium water. The substrate is washed only as needed.
The first time after startup, a homemade external filter actually works only as a mechanical one. Beneficial bacteria have not yet colonized the substrate. Dirt fills the filter, which reduces its performance. The water pressure gradually drops. But there is also a reverse process. Dirt is food for bacteria. They break down the organic substances that accumulate here and convert them into nitrate, i.e. The biological self-cleaning of the filter begins.
Complete colonization of the substrate with colonies of beneficial bacteria occurs in 2-4 weeks. And then it all depends on which process will take over - pollution or self-cleaning. If the former, then the filter will continue to get dirty. Not as intense as the first two weeks, but inevitable. When the filter performance drops below 30% of the maximum, it must be cleaned and restarted, otherwise the so-called. “capsizing” is a disruption of biological processes, as a result of which toxic substances are produced and released into the aquarium.
If self-cleaning takes over, then the filter, on the contrary, is gradually freed from dirt and the productivity that has fallen to 50-70% of the maximum is restored. Theoretically, after this the filter should work forever. In practice, productivity is not fully restored, and over time, stagnant zones still form inside the canister. Therefore, I recommend cleaning it from time to time, even if the water pressure is strong.
In addition, I would like to note that all metal parts must be free of lubricant. Because a drop of oil can spoil a ton of water and thereby destroy all your inhabitants. For this reason, it is advisable to use plastic parts (fittings, corners, taps), which in turn are much cheaper than metal ones.
PS
I later replaced the hoses with corrugated ones (which are used to drain the washing machine), since PVC hoses easily wrinkled and thereby blocked the access of water.
The external canister filter is the highest performing and most efficient aquarium filter. Since purchasing a canister aquarium filter costs a decent amount of money, aquarists tend to make the filter themselves, using inexpensive fillers and components that are easily purchased at hardware stores.
I bring to your attention detailed step-by-step instructions for making your own external canister filter. You can find out what an external filter is.
The design of the filter is interesting because the author of the filter did not use rare and expensive materials. All components are purchased at plumbing stores and regular hardware stores. If you are not a fan of aquarium brands, then your savings will be 50-60% of the price of a branded aquarium filter.
I should note that the advantage of this design is the possibility of easy modernization for greater productivity.
Do-it-yourself biofilter for an aquarium
In terms of its functions, a homemade biofilter will not be inferior to analogues from well-known manufacturers, if you approach the manufacture responsibly and select the right materials. In general, there are several options for biological filters.
Bowl in a glass
The simplest materials available in every aquarist’s home are suitable for this filter. You will need a small plastic bottle, a PVC tube with a diameter matching the size of the neck, soil (fine pebbles up to 5 mm are best), padding polyester and a compressor.
The manufacturing process itself goes as follows:
- The bottle is cut (at the upper border of the label). The main thing is that the upper half passes into the lower half with difficulty;
- In the resulting bowl (half with a neck) we make about 10 holes with a diameter of 3-4 mm;
- We insert the tube into it. It is important that it fits tightly. If there is a gap, then you need to seal it with silicone glue. The tube itself should be slightly higher in height than the bottom half of the bottle, and it is important that it does not reach the bottom;
- Pour pebbles into the finished body in a layer of 5-6 cm and lay padding polyester on it;
- The hose from the compressor is placed in the tube and secured there;
- Actually, the filter is ready. We throw it into the water, turn on the compressor, and check its functionality.
This is an extremely simple and quite effective option. The air will pass through the tube and go up. The substrate will be saturated with oxygen, and water will flow through the holes to the bottom of the tube and then into the aquarium.
Bottle filter
In principle, this option is similar to the previous one, but it also has its own differences. This time you will need a 1.5 liter plastic bottle, substrate, foam rubber, clamps, compressor, hose and sprayer.
The assembly diagram is not particularly complicated:
- Using an awl, we make holes in the bottom of the bottle;
- Next, it is wrapped with foam rubber and tightened with clamps;
- Approximately half of this container is filled with substrate;
- We run the hose from the compressor along with the sprayer on top;
- We place the finished structure in the aquarium, turn it on, and check it.
The size of the bottle is not important, but you should select it based on the volume of the aquarium and the power of the compressor. The operating principle is extremely simple. Flow occurs due to oxygen. Air along with water is forced out through the neck of the bottle, and from below the liquid passes through the holes made.
Thus, colonies of bacteria will settle in the filler, which, due to the flow, will absorb harmful substances.
What you need to make a pump
To make an aquarium pump with your own hands you will need the following components:
- 20 cc syringe;
- Silicone tube, with a diameter approximately slightly smaller than the diameter of the syringe;
- Electric motor 3 or 5 volts;
- Some other materials. In particular, you will need caps from 1.5 liter PET bottles (3 pieces), a piece of thin plastic, you can take from a CD box.
As for the tools for making a homemade aquarium pump, you will definitely need a hot glue gun, a cordless screwdriver and a small drill. You will also need a sharp knife and scissors to cut all materials. So, let's go.