The halter is a very important element of a horse's equipment and is used to carry the horse in the hands, to secure it in the stable or during transportation. Any horse should have this piece of equipment and should be taught to use it from a very young age. Today, in any horse shop you can find a wide variety from leather and synthetic halters to rope halters. However, you can make a halter for your horse with your own hands. We'll talk about this in this article.
[Hide]
Halter sizes
So, a halter for a horse is a free headband without a bit and, like a bridle, is fixed on the animal’s head using straps or carabiners. Their structure is almost identical in different species, they differ only in size and material. Leather ones are more durable with good care, but are impractical for everyday wear. But for everyday work, synthetic halters for horses will be more convenient, which you can do without fear of getting wet or dirty. A type of rope halter - halter - is made of durable nylon cords and secured to the head with knots.
Halters are used for calm horses or for show breeding of thoroughbred horses. They are quite impractical in everyday life, although they are popular among amateurs.
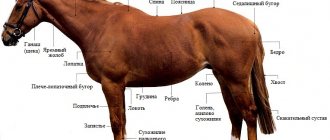
In order for a halter to be practical and safe to use with a horse, it must be the right size. Therefore, before you start making it yourself, take a very responsible approach to taking measurements of the horse’s head. Do not do it by eye, you need to take accurate measurements. If it is small, it can rub the skin on the head; if it is large, it can easily come off at the most inopportune moment.
Scheme for taking measurements from a horse's head
How to wear it correctly
You need to know how to put on a halter correctly. If you put it on incorrectly, it can irritate the animal. It should not cause a feeling of discomfort in the pet. And if everything goes well, the horse will work with positive emotions.
Video: how to put on a halter correctly It is quite possible to make a halter yourself, following the size table with points for knitting knots. A product made from synthetic rope is easy to wash and dries quickly, but its shelf life will be less than that purchased. This will be a gentle bridle for bathing and grazing the animal, but it is not suitable for restless individuals.
The bridle is the first “horse” accessory that appeared immediately after the domestication of the animal. Its modern appearance is very different from what it was in the ancient world. But in order for it to fully perform all its functions, you need to know what it is made of and how it works. This fully applies to horse halters.
An ancient bridle from Tibet, kept in the Metropolitan Museum of Art (USA)
Contents of step-by-step instructions:
Master class – synthetic halter
If the dimensions are taken, you can proceed to the selection of materials. We recommend making your own synthetic halter, which can be sewn with strong threads. It is more difficult to work with leather, as it requires some skill. If everything is ready, you can get down to business.
Tools and materials
- Durable synthetic straps;
- fleece or soft velor;
- sewing machine;
- strong threads;
- needle, scissors;
- awl;
- other tools as needed.
The request returned an empty result.
Step-by-step instruction
- Knowing the size of the horse's head, draw up a diagram of the halter and measure each strap to the correct size. You should get seven straps with allowance for stitching.
- Thinner material straps need to be double stitched. If you are ready to take them, then additionally you can only sew the edges.
- We attach a buckle or carabiner with a ring for fastening the halter to the top left side of the head strap. To adjust the length of the buckle, we make holes at the other end of the strap. To work with a carbine, immediately measure the required size of the neck strap.
- We leave an empty ring on the lower strap at the junction with the fastening strap. For this, either a chomp, or a cord, or an interchange will be attached to the halter.
- We connect all the straps using rings. An additional fastening with a buckle can be made on the capsule strap to adjust the size of the guard.
- We sew thin fleece or velor onto the inside of the snatch and back strap to prevent chafing.
- To see more clearly how to make this type of equipment for a horse, watch the video from newfriz sun.
Rules for using a halter
When handling a simplified version of the bridle, you must follow a number of rules:
- If the horse is led out with a halter, then the reins are held closer to the head. This way she will understand that she is a follower.
- They are always located on the left, do not go forward and do not lag behind.
- Care must be taken to prevent the animal from kicking, which is possible even with docile charges.
- The horse should not be allowed to be active while wearing a halter, to avoid injury and loss of control over the animal.
Read also: How flower clocks work
It doesn’t matter who or what the ammunition was made from - by a loving owner or by employees of a large enterprise. The main thing is that it is comfortable and does not injure the animal. Then the horse will not have any fear of the straps, he will be calm and submissive.
Nikolay Zhuravlev chief editor
Author of publication December 13, 2018
Did you like the article? Save so you don't lose!
The halter is a very important element of a horse's equipment and is used to carry the horse in the hands, to secure it in the stable or during transportation. Any horse should have this piece of equipment and should be taught to use it from a very young age. Today, in any horse shop you can find a wide variety from leather and synthetic halters to rope halters. However, you can make a halter for your horse with your own hands. We'll talk about this in this article.
Master class – synthetic halter
Tools and materials
Video “Weaving a rope halter”
Comments and Reviews
Rope halter
Do you have a young horse and want to train him to a halter? It's easy to do it yourself. To do this you will need regular other rope and the ability to tie knots. Stick to the plan and you will succeed.
Step-by-step instruction
- First of all, you need to learn how to tie double knots. They hold and fix the rope well and do not put pressure on the horse's skin.
- Tie a simple knot, but do not tighten it. The end of the rope must be brought behind the first knot parallel to the loop. Then a second knot is tied inside the first one.
- Now you can tighten two knots at once at the same level. The result will be a cross knot in the shape of the letter “X”.
- Once you learn how to tie knots, the rest will be quick and easy. Since all you need is to have measurements and tie knots according to these measurements to get the desired part or side of the halter top.
- For more details, see the diagram in the video.
Sorry, there are no surveys available at this time.
Video “Weaving a rope halter”
Everything will work out quickly and easily if you learn how to tie knots correctly. The knitting pattern is shown very well in the following video from Diana Galunova.
It would hardly occur to those who are professionally involved in equestrian sports to make a headband for a horse with their own hands. But for many, horse riding is just a hobby that they can’t spend a lot of money on. If your factory bridle for a horse is worn out, but you don’t want to buy a new one, there is a way out!
The headband can be very simply made from old belts, which can be purchased for almost nothing at any flea market or found in your attic. These instructions show the dimensions taken from an existing old bridle; you will have to use the dimensions of yours as a guide.
Tools:
- sewing machine
- scissors
- stationery knife
Materials:
- old belts (canvas ones don’t look as nice, but they are more convenient to use)
- old horse bridle
- threads
- two medium-sized steel rings (these often replace buckles on belts)
How to make a bridle for a horse without extra costs and much effort?
How to make a bridle for a horse at home? It is no secret and, moreover, not news at all that bridles (horse equipment) after a long period of use, like any other thing, wear out. For professionals, and not just horse lovers, it will not be difficult to buy another factory bridle. Amateurs, taking into account the fact that they do not have as many abilities and resources as professionals who are involved in equestrian sports, are looking for a cheaper way to make a bridle for a horse on their own. The answer is more than obvious - you can do everything yourself.
There is more than one type of bridle for horses, for example, bit and bitless. Another type is the cowboy bridle. The main difference between them is that a cowboy bridle, in case of any problems with the serviceability of the headband, can be easily and quickly repaired in the field. So how do you make a bridle for a horse?
Making a headband
1. One of our belts already had two perfectly matching rings attached to it. The rings were flat on one side. To remove them from the belt, simply cut the seam threads with a utility knife or scissors.
2. Make cheek straps of the required length. Cheek straps are long strips that connect the bit (part of the bridle that is inserted between the teeth of the animal, also called the mouthpiece) with the nape (occipital, passing behind the horse’s ears) strap. First you need to trim the leather pads from the cotton belts. The easiest way to do this is to cut the seams with scissors or a knife. To determine the size, simply detach the cheek straps of an old factory bridle from the bit rings and lay them out on the table. Place the cotton straps nearby and mark the desired length with a pencil. It is advisable to mark the position of the holes at the same stage. In our case, the length of the cheek straps was 72 cm, excluding the buckle.
3. Make a chin strap. The chin strap cannot be removed from the factory bridle, so simply attach the strap to it and, leaving allowances for the loops, mark the desired length. The chin strap consists of two parts. There should be a buckle on one side of the end of the strap. Our strap uses a two-ring fastener instead of a traditional buckle. This design works great and eliminates the need to punch holes in the second strap. In our case, the length of the strap with a free end was 48 cm (plus 4 cm for overlapping stitching), and the length of the strap with a buckle was 31 cm (plus 4 cm).
4. Make a forehead protector and a head strap. In our old bridle, the browband and head strap were the same length, so we simply repeated the same steps twice. Simply place the straps on the matching straps on your old bridle and decide on the length you need. You need to leave an allowance of 4-5 cm on each side of the belts so that they can be sewn on without any problems. We played it safe and left 6 cm each. The length of the forehead and corner belt was 49 cm with allowances and 37 cm without allowances.
5. Finish the edges of the cheek straps. To prevent them from unraveling, they must be carefully sheathed.
6. Check if everything is done correctly. Place the factory bridle and prepared straps on the table. Place the straps in the same order as on the sample. Make sure you haven't missed anything or made a mistake with the dimensions anywhere.
7. Sew the straps. Thread the belt through the ring and make a cuff. You can secure the loop using pins. First, sew a straight seam across the overlap, the seam should go approximately in the middle. Then reinforce the joint with one or two zigzag stitches. The principle “you can’t spoil porridge with butter” applies here. Remember that the lapels of all belts must be on the outside.
8. Drill holes for fixation in the buckle. To attach the cheek straps to the bite rings, you need to make holes in the straps for fixation in the buckle. To do this, you can use a regular drill with a small drill bit. It is better to drill at low speeds.
9. The bridle is ready. Pull the cheek straps through the main rings and through the bite rings. Attach the reins. Place the bridle on the chair and pull on the reins, making sure that as you pull the reins, the cheek straps evenly tighten the bit rings.
Since man tamed the horse, he has not used such devices as bridles. After a while, horses became the traction force and pulled carts. It was at this time that the peasant faced the question: how to tie the cart to the horse? From that era, the use of headbands began: halters and bridles.
Horse in a bridle
Halter - a device for accustoming a horse to a person
The term “halter” does not mean a complete bridle set (without a bit). Such equipment is used to remove an animal from a pen or secure it in a stall. Belts according to use can be divided into:
- capsule;
- chin;
- buccal;
- occipital.
The main thing is to hold the reins firmly, near the head, when leading the stallion. This grip helps control the ungulate. Plus, when leading a horse, you need to take a comfortable position - to the left of it.
At the same time, the horse should run parallel to you. After all, any deviation entails bad consequences. The horse may jerk to the side or step on your heel.
For particularly sensitive stallions, a rope halter was invented. It allows you to work with the ungulate, acting on it gently. After all, the horse feels the pressure of the round nodules on parts of the body, and in order to get rid of the unpleasant effects, he has to turn his head in the direction you have chosen.
To select a rope halter, you should pay attention to the thickness of the thread. To make a halter, you need to choose a nylon or yacht rope. But the first one is slippery, which means it’s more difficult to make equipment out of it.
Rope halter suitable for sensitive horses
A rope halter placed on an ungulate requires compliance with certain safety rules:
- Do not leave the horse in it for a long time.
- Do not allow horses to frolic if one of them is wearing a rope halter.
- Do not leave your mare unattended while wearing this harness.
- Select the correct size of rope equipment (the hoof should not pass between the head and the rope). This is easy to do - you just need to take measurements of your pet.
Bridle and its components
A bridle is a piece of equipment used to harness an animal, which is placed on the horse's head. The headband consists of the following elements:
- occipital strap;
- cheek straps;
- chin strap;
- forehead protector;
- capsule;
- reins;
- bit (glands located in the animal’s mouth).
Let's take a closer look at each component element. The head or poll strap is designed to hold the bridle on the horse's head.
It passes behind the ears, staying on the back of the head of the ungulate.
Cheek straps wrap around the horse's head on both sides
Cheek straps run along both sides of the head and connect the snaffle rings and the neck strap. This detail allows you to hold the bit in the animal’s mouth.
The chin strap is needed to hold the bridle on the head and is located under the ganaches. Currently, there are some types of bridles for which such a component is not needed.
The forehead protector adorns the animal's head and is attached behind the horse's ears. Does not have any special effect on securing equipment.
The capsule is an element of the frenulum that limits the movement of the mouth. Doesn't allow the horse to mess around. After all, when acting on the bit, the rider causes pain to the animal, and in order to alleviate the suffering, the horse wants to open its mouth. This is where the capsule comes to the rescue, preventing the horse from getting rid of the inserted device, forcing it to obey the rider. But not everyone needs it. It depends on the temperament of the horse.
The rein is a long braid attached to the bit, through which the rider exerts influence on the animal.
Snaffle head diagram
Traditions and rituals
Since ancient times, people have attached special significance to many household items. And the bridle was no exception. And since the horse was a person’s most active assistant a hundred years ago, this item was endowed with various magical properties. Therefore, different peoples have many rituals in which this attribute is present.
First of all, bridles are in demand in traditional wedding rituals. For example, among the Turkmens they threw it over the bride’s clothes, and the groom tried to use these ropes to remove the headdress from his future wife. This ritual is intended to remind you of the obligatory submission of the other half.
Read also: Is it necessary to dig up gladioli in the fall?
The bridle is an object for ritual actions among the Turkmen
In Rus' it was believed that this item was able to protect the wedding procession from the evil eye. When the sorcerer left the newlyweds’ courtyard, he went to the stable and blew on the bridle. It was also not customary to buy a horse without this item. It was believed that this would make it worse for her to get used to the new home. The Kazakhs put a bridle in the boy’s bed every day. According to their beliefs, such a ritual will help raise their son to be a good horseman. After receiving baptism, Ossetians performed this ritual for some time. A bridle was placed in the hand of the deceased man and the horse was led around the grave.
The Russians also had a wedding ceremony with ammunition.
Types of bridles
Today, several types of bridles have been invented to control horses:
- snaffle (provides direct contact between the rider and the horse);
- mouthpiece (implies precise control of movement);
- cowboy (consists of three straps);
- for racing (a connection between a halter and a bridle, which is suitable for long riding, because by unfastening the bit, the animal can be allowed to eat);
- hackamore (in this form there is no bit);
- Western headband (used without a capsule and a strap for one ear is used instead of a forehead protector).
The first option is simple equipment that helps the novice rider cope with the temperament of the horse. The snaffle, unlike the mouthpiece, is soft. It comes in plastic, iron and even rubber.
Accordingly, injury to the animal’s mouth is minimal. The influence of a thick component occurs more easily, so this headband cannot be called strict.
Types of bits
Thanks to a specially designed form of equipment, it becomes easier to control the horse's head and rhythm of movement. To avoid injuring the ungulate with your own hands, the headband must be put on by a professional who will select the correct size and evaluate the degree of tension.
The mouthpiece is a part that is tightly connected to the cheeks and has a curved middle, which allows you to influence the animal’s mouth, thereby controlling the horse. The height of the bend depends on the thickness of the stallion's tongue.
The size of the mouthpiece is selected in accordance with the width of the mouth of the ungulate.
Hamkor is a bitless bridle and is suitable for herbivores who find it difficult to choose the size of the bit or have problems in the oral cavity (inflammation, swelling). It is dangerous to trust such a design to a novice rider. After all, the impact occurs on the nasal part. It can be damaged by making one awkward movement with your hands.
Diagram of the bridle of the Voeikov model
Bridles are mainly made of leather, so such a device requires careful care. Be sure to remove the harness and harness after the walk and give the stallion a rest. The components must be rinsed with clean water and wiped off dirt with your own hands with a rag. Weekly care of the headband involves lubricating it with a rich cream.
After visiting the store, the buyer says: I need a bridle for a horse. But how to choose it? You can't rely on your taste. When purchasing a headband you need to know:
- breed of horse;
- his character;
- dimensions;
- animal functionality.
Accordingly, a correctly selected headband will prolong the life of the horse, because according to veterinarian Dina Andreeva: “a raised back of the head and a tucked in rear make it possible to unload the front legs and shoulder girdle, which are somewhat overloaded with the weight of the rider.
A rounded back of the head is not needed for beauty. This position of the poll indicates that the back muscles under the saddle are relaxed, which is necessary for the horse’s back to remain healthy for a long time.
When working with a horse, you should remember to take responsibility for your actions, be humane and caring. Everything must be done to ensure that the animal does not suffer.
A horse in the wild does not need any additional equipment. Horse halters and bridles began to be used after the animal was domesticated for riding and work. Products are made in such a way that the horse holds the cart tightly and feels comfortable.
Only after the animal was domesticated did they begin to use a bridle and halter for riding and work.
A halter is a device that is placed on a horse’s head for the convenience of leading it out of the paddock, guiding its movement, and securing it in a pasture or stall. If you remove the bit from the bridle, you will learn a halter.
To ensure that the animal obeys and does not escape, you need to hold it by the belt near the head. It is more convenient to walk on the left, leading the horse with your right hand - the movement should be parallel to each other. If you frighten a horse, the animal can hit a person, step on a foot, break free, or behave unpredictably.
The halter can be made from rawhide or rope if the animal is sensitive. The thread for the rope device is used from yacht or nylon - the second is more slippery and more difficult to work with. The halter must be worn during bathing and grooming.
The belts should not be tight, and the hoof should not fit into the free space.
If you remove the bit from the bridle, you will get a special device - a halter.
Elements that make up a halter:
- carabiner or buckle;
- muzzle strap or noseband;
- cheek, chin and occipital straps.
Putting on a halter is easy. First you need to make sure of its integrity so that there are no cracks or broken fasteners. The carabiner, which is usually located on the left side, is checked.
Before putting on the product, the horse needs to be prepared, stroked, and talked to. If the animal is unfamiliar, you need to spend more time on the horse and not make sudden movements.
First, a chombur or cord (ropes of various lengths for working with a horse) is placed around the neck. This is for safety reasons in case the horse wants to run away.
The buckle of the corner belt is unfastened. The position of the person is on the left of the horse, the right arm is thrown over the head of the animal. The device is put on the muzzle with the left hand, the head strap is fixed behind the ears, and the carabiner is fastened.
Halters for horses differ only in color, material and size; the structure is the same for all. For everyday wear, it is better to use a product made of synthetic materials.
A type of halter is a halter. These are rope products that are secured to the head with knots. Halters are convenient to use for calm horses or during a show.
Making a comfortable halter for your pet
Making a comfortable halter for your pet
A halter is one of the accessories that is used for dogs. However, despite the existence of this element of dog equipment, a significant number of pet owners are not aware of what it is and for what purposes this accessory should be used. Why is it so important along with other equipment for a pet, and how to make it yourself at home, we will talk about this in detail in this material.
What is a halter?
When a person decides to get a dog, he immediately purchases the accessories that he will need in the process of keeping a pet. The first thing, of course, is to buy a collar, and in addition to this, purchase toys for the pet. At the same time, many people forget to buy a halter or halti. This is exactly what this accessory is called differently.
A halter should be understood as an accessory that is intended for dogs and its main function is to fix the animal’s muzzle, so that the pet can be walked without any difficulties. Quite often this accessory is also called a bridle collar.
Thanks to the collar-bridle, a secure hold on the cheeks and jaws of your pet is ensured. If we talk about the composition of this accessory, then it contains two straps. One of them is secured on the upper part of the scruff. The other is fixed on the back of the dog’s nose. Using two point straps, the halti's neck strap is securely connected to the bow strap. The straps should fit snugly on the cheeks, but under no circumstances should they be pressed into them. In order to correct the behavior of a pet at home and on the street, a bridle collar is used.
When choosing, you need to focus on the size of your pet and choose this accessory based on this. Then you won't go wrong with your choice. You should know that if the collar is very tight, then when the pet makes sharp jerks during a walk, then by such actions it can injure itself and the animal’s jaw will be damaged.
Read: Choosing the right muzzle for your dog
If your dog is wearing a bridle collar, then under no circumstances should it be left unattended.
Please remember that this accessory should only be used for walking your dog on a leash.
The nose strap should be located directly in front of your pet's eyes. It should lie on the muzzle quite freely. This strap must be inserted into the metal ring that is present on the chin strap. The leash itself is attached to another ring. When the leash is pulled, the central ring is pressed against the lower jaw, and in such a way that the leash-bridle does not slide to the side.
When you first put on your pet such an accessory as a muzzle-bridle, it will be unusual for your pet to be in it for the first time. Therefore, it is necessary to accustom your pet to this accessory in the same way as to a muzzle.
There are several types of halters. One of them is khalti. The other is called Gentle Leader. The halti must be worn together with another collar, since its fastening is quite loose. This accessory does not tighten, so it is optimal to use it for a dog that has a large muzzle.
As for the Gentle Leader halter, the muzzle fixation is better in such a bridle collar. It is in this regard that this type of accessory differs from halti. Therefore, when using this device, another collar is completely unnecessary.
The Halti should not be considered as a muzzle. You should also know that such a collar-bridle cannot cause harm to your pet when worn.
Making Halti yourself
If you decide that you need such a halter, then you can easily make it yourself. In order to create it you will need a little time and patience. In addition, it is necessary to prepare the necessary material and tools before starting work. We will present simple instructions on how to make a halti collar-bridle below.
Tools and materials for making Khalti
Before you begin making this accessory, it is necessary to carry out preparatory work, which will be expressed mainly in the preparation of the necessary materials, as well as the tools that you will use in the manufacture of this accessory.
Read All about dog leashes
The materials you will need are a belt 2 meters long. You also need to prepare two 25 mm rings. In addition, you need to find or purchase two small carbines in the store. You will also need a fastener: the width of the fastener should be equal to the width of the belt. In addition, the tools for making the accessory will require a needle, strong threads and a meter for carrying out measuring work.
Please note that the materials for making this accessory should be selected according to the size of your pet.
Step-by-step instructions for making Khalti
In order for you to spend as little time as possible on making the collar-bridle, and to please you with the end result, you must strictly follow all the steps contained in these instructions and not deviate from the recommendations.
The first thing you should do when making this accessory is to take measurements and find out the girth of your animal’s muzzle. The data you obtain during this work should be recorded.
After this, you need to measure the distance between the measuring points of the neck and muzzle.
The next step is to measure the distance to the halter from the collar ring.
Next, you need to cut off pieces of the belt tape in accordance with the dimensions obtained earlier.
The next step is to sew the ring to the sling, for which you will need thread and a needle. In this case, the size of the sling should be equal to the circumference of your pet’s muzzle.
You must proceed in the same way at the next stage, when you need to sew a fastener to a segment that should be equal to the circumference of the pet’s neck.
Then you can move on to the next step - sewing on the carabiners. When you make a halti, you need to constantly adjust the accessory to the size of your dog.
When the bridle collar is ready, all you have to do is put it on your pet, and then fasten the lower ring to the leash.
51votes
Article rating
What is a bridle
Bridle structure for a horse:
- capsule;
- forehead protector;
- occipital, chin, cheek straps;
- reins;
- bit (elements that are in the animal’s mouth).
Horse bridles come in many different shapes, each used for a different harness.
A typical bridle consists of the following elements: noseband, browband, straps, reins and bit.
Types of bridles:
- For direct contact between horse and person - a snaffle.
- To hone movements - a mouthpiece.
- The cowboy's reins have three straps - their reins are not connected, so that if they fall to the ground they do not get tangled.
- For fast walking and running, the bridle is more like a halter - with the bit unfastened, the animal can stop to eat.
- A bridle without a bit is called a hackamore.
- Without capsule and forehead - Western headband.
For a beginner rider, a snaffle bridle is suitable. This is a classic option that will allow you to control the horse, understand its movements and behavior. This is a soft product, the materials for manufacturing are rubber, iron, plastic, the risk of injury to the animal’s oral cavity is minimal.
The product must be put on carefully; even with your hands you can injure the horse. The headband must be selected or made exactly to size, and the degree of tension must be adjusted. Some parts of the bridle are modified.
A mouthpiece is a part of a product with a curved middle to regulate the behavior of an animal through its mouth. It is important to choose the correct height of the bend so that it does not interfere with the animal’s tongue or put pressure on the cheeks.
Hackamores are horse bridles without a bit, used if the horse has problems with the oral cavity or while walking to make it easier to eat grass. In order for the manager to have influence on the horse, pressure is applied to the nose. Only an experienced rider can cope with such control.
In addition to cleansing the bridle from dust and dirt, it needs to be lubricated with a rich cream once a week.
When choosing a bridle, you cannot rely only on your taste. It is necessary to take into account the horse's breed, character, intended purpose, and head size.
A properly fitted bridle and rider control will help your horse stay healthy longer. When the head is in the correct position, the shoulder girdle is unloaded, and the muscles of the front legs are not so tense.
The interaction between the rider and the horse is carried out through the oral cavity. When the bit presses on certain parts, the animal understands what to do. The iron element is installed in the mouth without touching the teeth.
Certain actions also put pressure on the back of the head, cheeks, and bridge of the nose. The effect is on the tongue, palate, corners of the mouth, and chin pit.
The chin and noseband straps are unfastened, the headband is in the left hand, the reins are in the right. A halter is put on and an iron is placed in the mouth on the area of the jaw without teeth.
The horse may refuse to do this, then you can add a piece of sweet carrot or sugar along with the bit.
Next, the occipital bridle strap is put on and the chin strap is fastened. A fist should be placed between the last element and the head. After fastening the noseband, there should be a space of two fingers between it and the skin.
The structure of the bridle
The simplest piece of horse equipment is a bridle. It is put on the horse's head. To control the horse, the man used the structural features of its jaws. A snaffle consisting of two metal rings and a bit (snaffle) is placed on the toothless edge of the jaw. The bit consists of two metal parts movably connected to each other, which prevents the horse from biting the bit.
The simplest bit bridle consists of the following parts:
- occipital or supine belt;
- adjustable cheek straps;
- forehead strap;
- chin strap;
- bit (iron) fastened to the cheek straps.
Correctly fitted straps ensure the correct position of the bit (iron) in the horse's mouth and make it possible to rationally influence the animal's head. Sometimes the bridle is supplemented with a noseband, which limits the opening of the mouth and prevents release from the bridle. Nozzles vary in location on the horse's muzzle and in the width of the straps, which allows for varying degrees of control over the horse. The most commonly used are regular (English), Hanoverian and Mexican capsules.
The main lever of influence on the horse through the bit in the mouth is the reins. With their help, the rider can control the actions of the horse. This type of bridle is basic and is used in most types of riding. In addition to the simple snaffle, other types of bridles are also used: mouthpiece, simplified cowboy, for running, hackamore - a bridle without a snaffle, western headband.
Read more: How to build a gooseneck with your own hands, drawings, dimensions
The bridle is not a monolithic object, it consists of several components connected together.
The structure of a bridle for a horse is as follows: the main components are the rein, noseband and bit. The rein is necessary for the rider to turn the horse in the desired direction while moving. The simplest bridle is attached to belts. The belts are located in the following places:
- on the head;
- on the forehead;
- on the chin;
- on the cheeks.
The most popular is the snaffle bridle; it is an ideal option for beginning horse breeders and athletes. This type of bridle helps to completely control all the horse’s movements without causing any inconvenience to the animal. The most important advantage of this bridle is the presence of additional straps, thanks to which the bridle strap does not slide over the horse’s eyes and does not interfere with it.
The snaffle bridle can be either strict or not strict. The tighter the bridle, the more tightly the rider controls the movement of the animal. To loosen or strengthen the severity of the bridle, it is enough to replace one type of noseband with another. Removable nosebands can be purchased from stores that sell equestrian accessories and equipment.
Note! Professional riders always have several nosebands in stock and change them as needed.
Making a halter
It is better to sew a halter for a horse from synthetic strong threads; working with leather requires experience and special skills. First, measurements are taken from the animal's head.
How to weave a rope halter? The following materials will be required: synthetic straps, fleece, threads, needles, scissors, awl, sewing machine.
You can make a rope halter according to the diagram using individual head measurements.
The halter can be sewn or woven with your own hands, after first taking measurements from the animal’s head.
The result is 7 straps, adding a few centimeters for seam allowances. The finished straps are connected to each other, and it is recommended to sew the thin synthetic material in two layers.
A carabiner is attached to the left side of the head strap for fastening, and holes are made on the opposite strap to adjust the length.
To attach a cord, a cord or a tie-down, a ring is left at the intersection of the lower and fastening belt. All straps are connected with the same rings. To prevent the material from rubbing the face, the back and shoulder straps are stitched with a layer of fleece.
Halter is made using knotted weaving. The advantages of double knots are their strength; they do not rub the animal’s skin. How is a horse halter made?
Double knot weaving pattern (yacht rope can be used):
- Tie a regular loose knot.
- Parallel to the bottom loop, the edge of the rope is inserted into the main knot.
- Another knot is tied inside the first one.
- The knots are tied tightly. Two knots must be tightened at the same time.
To begin with, measurements are taken of the horse's head. Main parameters: length of the cheek strap, thickness of the head at snoring level, length of the head strap. You can use standard sizes.
Table of standard sizes for making your own halter.
Diagram of the location of knots when weaving a rope halter.
The next stage in the arrangement of knots when weaving a device.
- Section F is laid aside and a double knot is made at point No. 2.
- Section Z is set aside. The end of the rope is inserted into knot No. 4. A double knot is performed.
The next stage of weaving a halter is to perform another double knot.
- The rope is laid out as shown in the diagram, segment I is laid out, the end of the rope is inserted into node No. 1 and made into a double one.
The final stage of weaving is before tying the halter.
- After fitting, a place for the carbine is marked. A knot similar to No. 5 is made.
How to tie a halter? Section A and K are a corner belt. Their ends need to be threaded into knot No. 5 and tied.
Making a bridle
The difference between a bridle and a halter is the presence of a snaffle - a metal ring that is placed in the oral cavity.
How to make a bridle for a horse with your own hands?
Necessary materials:
- leather or canvas belts up to 1.5 cm wide;
- metal rings up to two cm wide;
- scissors;
- sewing machine;
- snaffle.
Diagram of the main elements of a bridle (training headband), consisting of straps and a snaffle.
Scheme for making a bridle:
- A segment equal to three measurements is measured: from the corner of the mouth through the cheeks to the ears, through the back of the head to the opposite corner of the mouth. 10 cm is added to this length.
- A belt is cut off in length from the left ear to the right (frontal belt). 10 cm is added.
- Add 3cm to the chinstrap for a loose fit.
- The forehead strap is put on the cheek strap and pulled through the loops.
- The cheek strap and chin strap are sewn together.
- The cheek strap and snaffle are threaded through the rings.
- Reins of a convenient length are sewn to the snaffle rings.
How to make a bridle for a horse
You can make both a simple and an exclusive bridle with your own hands. It will be exclusive, since various options for its creation and decoration are possible. The only limitation can be the imagination of the creator. But first you need to learn how to sew a simple snaffle bridle. For sewing, you can use a sewing machine or you can sew by hand. The threads must be strong. It is worth watching video tutorials on this topic with comments. Since leather is usually used to create bridles, you will need several straps about 1.5 cm wide, 2-3 rings, several buckles and a snaffle.
- measure the distance along the line from the corner of the horse's mouth along the cheeks to the ears, behind the ears and from the ears to the opposite corner of the mouth, plus 10 cm for loops on each side. These will be the cheek and back straps together. If we want to lengthen the bridle along the length of the horse’s muzzle, we will need to sew a buckle on each side at a distance of about 7–10 cm from the ends;
- measure the distance for the forehead strap - from the intersection with the cheek strap across the forehead to the intersection with another cheek strap plus 10 cm for the loops;
- From the same points we measure the distance down through the ganache and up for the chin strap plus 10 cm for sewing in the buckle. We select the place for sewing the buckle at a distance of approximately 1/3 of the length of the chin strap;
- we make loops at the ends of the forehead strap and thread them into the cheek-occipital strap so that the forehead strap moves freely;
- we sew the chin strap to the cheek-occipital strap just in front of the frontal;
- we sew or attach the cheek-occipital strap to the snaffle rings through buckles;
- for the reins, we measure about 1.5 m and sew or connect using buckles sewn at a distance of 7–10 cm from the ends to the snaffle rings.
All that remains is to try the bridle on your horse.
Precautionary measures
When a horse is put on a halter, it is closely monitored. If an animal gets caught in a tree or fence, there is a risk of injury and death. To ensure safety, break halters are made with a leather insert in the upper part. The replacement part is secured with fasteners, which burst under high pressure.
If the belts are not leather, but nylon, then the replacement part can be made thinner so that it can tear. It is installed on the cheek part.
Safety precautions:
- in the stall, in the pasture, or during play, the horse does not need a bridle;
- if the animal is tied, all accessories are removed from the head;
- during contact with other horses, the animal’s movement should not be hampered by anything;
- The halter made must correspond to the measurements of the horse's head.
When using special devices to control a horse, you need to be careful not to harm the health of the animal. To tie a halter and bridle with your own hands, it is recommended to read the instructions and consult with professionals.
Summary
To make accessories for a horse, you will need some experience with the animal. For beginners, it is better to visit the store and purchase a finished product. The main condition is comfort for the horse.
To make it easier to care for a horse, there are halters. They are needed to make it more convenient to drive the animal.
Leather halter One type of halter Blue halter for a horse Rope model of a halter Rope halter Beautiful halter with a chain Leather halter Beautiful halter in the form of a pigtail Leather model of a halter Rope type of halter
What is a halter?
This is a special device that is put on a horse for the purpose of leading it out of the paddock, fixing it in a stall or in a pasture, and directing the movement of the animal. The halter follows the structure of a horse bridle, but does not have a bit.
The product consists of the following components:
- noseband, or muzzle strap;
- buckle or carabiner;
- strap for cheeks, back of head and chin.
The device is most often made on the basis of rawhide, but for sensitive animals, yacht or nylon ropes are more suitable. The latter are more slippery and harder and more inconvenient to work with. In this case, you need to know exactly how to weave a leather halter.
Operation of the device is relatively simple. Having made sure that it is in good working order, the horse is prepared, talked to, and stroked. A cord or chombur (ropes of different lengths) are thrown around its neck, which will prevent the animal from escaping. The buckle on the head strap is unfastened and the right arm is thrown over the horse’s head. The halter is pulled over the animal's muzzle with the left hand, and then the head strap is secured behind the ears and the carabiner is snapped into place.
The structure of the halters is always the same, only the color, size and material differ. A type of device is halters, which are products made of ropes that are fixed with knots on the head. Such products are suitable for calm, peaceful animals or for displaying horses at shows and exhibitions.
How to make a halter with your own hands?
Instead of purchasing a professional horse halter, it is assembled at home. If all recommendations are followed, it will not be inferior in quality to the purchased device.
Halter sizes
The main criterion for the convenience of a product is that its size matches the dimensions of the horse’s head. In view of this, it is necessary to approach taking measurements from a horse’s head with all responsibility. All indicators must be accurate. If the device turns out to be too small, it will rub the animal’s skin, and if it is too large, there is a risk that the halter will come off the head while working with it, since it still cannot be clearly fixed. The halter for a foal should be smaller than for an adult animal.
Correct tailoring
After all the measurements have been taken, you can proceed to making a bridle without a bit. Sewing leather accessories requires skill, so at home they work with synthetics. It is necessary to prepare the following materials and tools in advance:
- strong synthetic belts;
- sewing machine;
- scissors, needle;
- velor or fleece;
- strong threads;
- awl.
To begin with, they draw up a schematic example of a halter and, based on it, measure out all the straps. It turns out 7 straps with a small allowance for sewing. If the material used for belts is too thin, it is stitched twice. When using ready-made straps, you only need to stitch the sides again.
On the left side of the back strap, in the upper part, a carabiner or buckle is attached, equipped with a ring to fasten the product. Several holes are made at the other end of the belt in order to adjust the length of the buckle. The required dimensions of the neck strap are measured right there in order to work with the carabiner.
On the strap located below, where the fastening strap is attached to it, an empty ring is kept. It is needed to attach a cord, a cord or a garter to an object. All available straps are connected to each other with rings. On the capsule belt there is another mount, equipped with a buckle in order to adjust the dimensions of the guard.
Velor or fleece is sewn to the inside of the neck and snoring straps, which will reduce the risk of skin abrasion. In order to sew a halter on a foal six months or younger, you need to use the softest materials possible.
Rope models
Halters and halters made from ropes are suitable for young, untrained animals. To make them yourself, you need to learn how to correctly tie double knots. They hold the animal tightly, but at the same time do not tighten its skin and do not cause discomfort. The rope is tied into a simple angle, but not tightened. The edge of the rope is brought behind the original knot so that it is parallel to the loop.
After this, another knot is tied inside the first knot. Then, 2 knots are tightened simultaneously at an equal level. As a result, a cross knot in the shape of the letter X will be formed. After all the knots have been correctly completed, you can proceed to making the halter. Before starting work, it is necessary to measure the horse's muzzle from different sides and positions and, based on this, make knots at the necessary points.
How to weave a rope halter for a horse with your own hands
In order to make a rope halter with your own hands, you should use the following materials and tools:
- yacht rope - 670 cm (this is the length for a medium-sized Cob-Large halter);
- a marker in a contrasting color to the color of the rope;
- scissors;
- lighter;
- ruler.
When weaving a halter, we perform the following steps:
- Cut the rope to the required length (670 cm). We singe the edges of the cut piece with a lighter so that they do not unravel.
- We measure 90 cm from the end of the rope with a ruler (point A from the size table) and mark it with a marker. We tie a knot in the intended place - hold the rope with our left hand, and then throw it with our right hand over the top of our left and pull the rest of the rope through the resulting loop. Carefully tighten the knot so that it is in the intended place.
- We measure and mark the distance to the next point 22.5 cm (point B). We tie exactly the same knot as described in the previous paragraph.
Video: making a halter
Precautionary measures
Special attention is required when using the halter. If an animal gets stuck with a device in a fence or trees, especially at full speed, it can cause severe injury and death. To increase safety, special breaking products are used, in the upper half of which there is a leather insert. The replacement part is fixed with fasteners that can burst under strong impact.
When using nylon straps instead of leather, the replacement part is made thinner, which will allow it to break. It is located on the cheek part.
The basic safety requirements when using a halter include the following recommendations:
- When the horse is tied, the device is removed from its muzzle.
- The halter you buy or make yourself must match the measurements of the horse's head.
- On pasture or during various games, the animal does not feel the need to be reined.
When the horse is in contact with other animals, its movements should not be constrained by anything. In this case, you do not need to use the device.